Updated Image - Redid the Screen Bezels
Tried to keep it as original as possible
In the world of retro computing, especially portable retro computing, few computers are as iconic as the GRiD systems laptop. GRiD pioneered the clamshell laptop design in the early 80s with the GRiD Compass, a staple in military and NASA missions, and both as seen in the director's cut of Aliens. So when I realized I needed a laptop for business and personal use (can't always take a
desktop everywhere), I settled on building one inside of a rusted out GRiD rather than buying off the shelf.
There were two initial concerns right from the start. First was concerning the keyboard. Intended to use the original keyboard which consists of a rather strange layout. Notice first the spacebar which is labeled "Bloomberg". This laptop was custom built for the financial corporation, and included a financial keyboard with bucket loads of random custom keys I knew nothing about. To fit these extra keys, the punctuation was shuffled around to the alphabetical keys. Thus, each alphabetical key printed three characters: capital, lowercase, and a punctuation mark. Much like a
3 bank typewriter, these keys needed two modifier keys. Having never coded anything before in my life, I opted to reach out to Frank Adams, a retired software engineer who wrote this cool
instructable, for help.

The second concerning problem was the screen. Luckily that was solved for me by a redditor in the r/CyberDeck community. The LCD panel I used to replace the widescreen gas plasma display is a spare BMW 5 series navigational display: a claa103wa01, which is a centimeter shorter but also quite a bit longer than the original display. The resolution isn't half bad either. Compared to my LG ultrawide 1080p monitor, this tiny thing has higher pixel density. So using it turns out to be quite convenient.
Anyway, nobody cares about all of that. Let's get into the build.
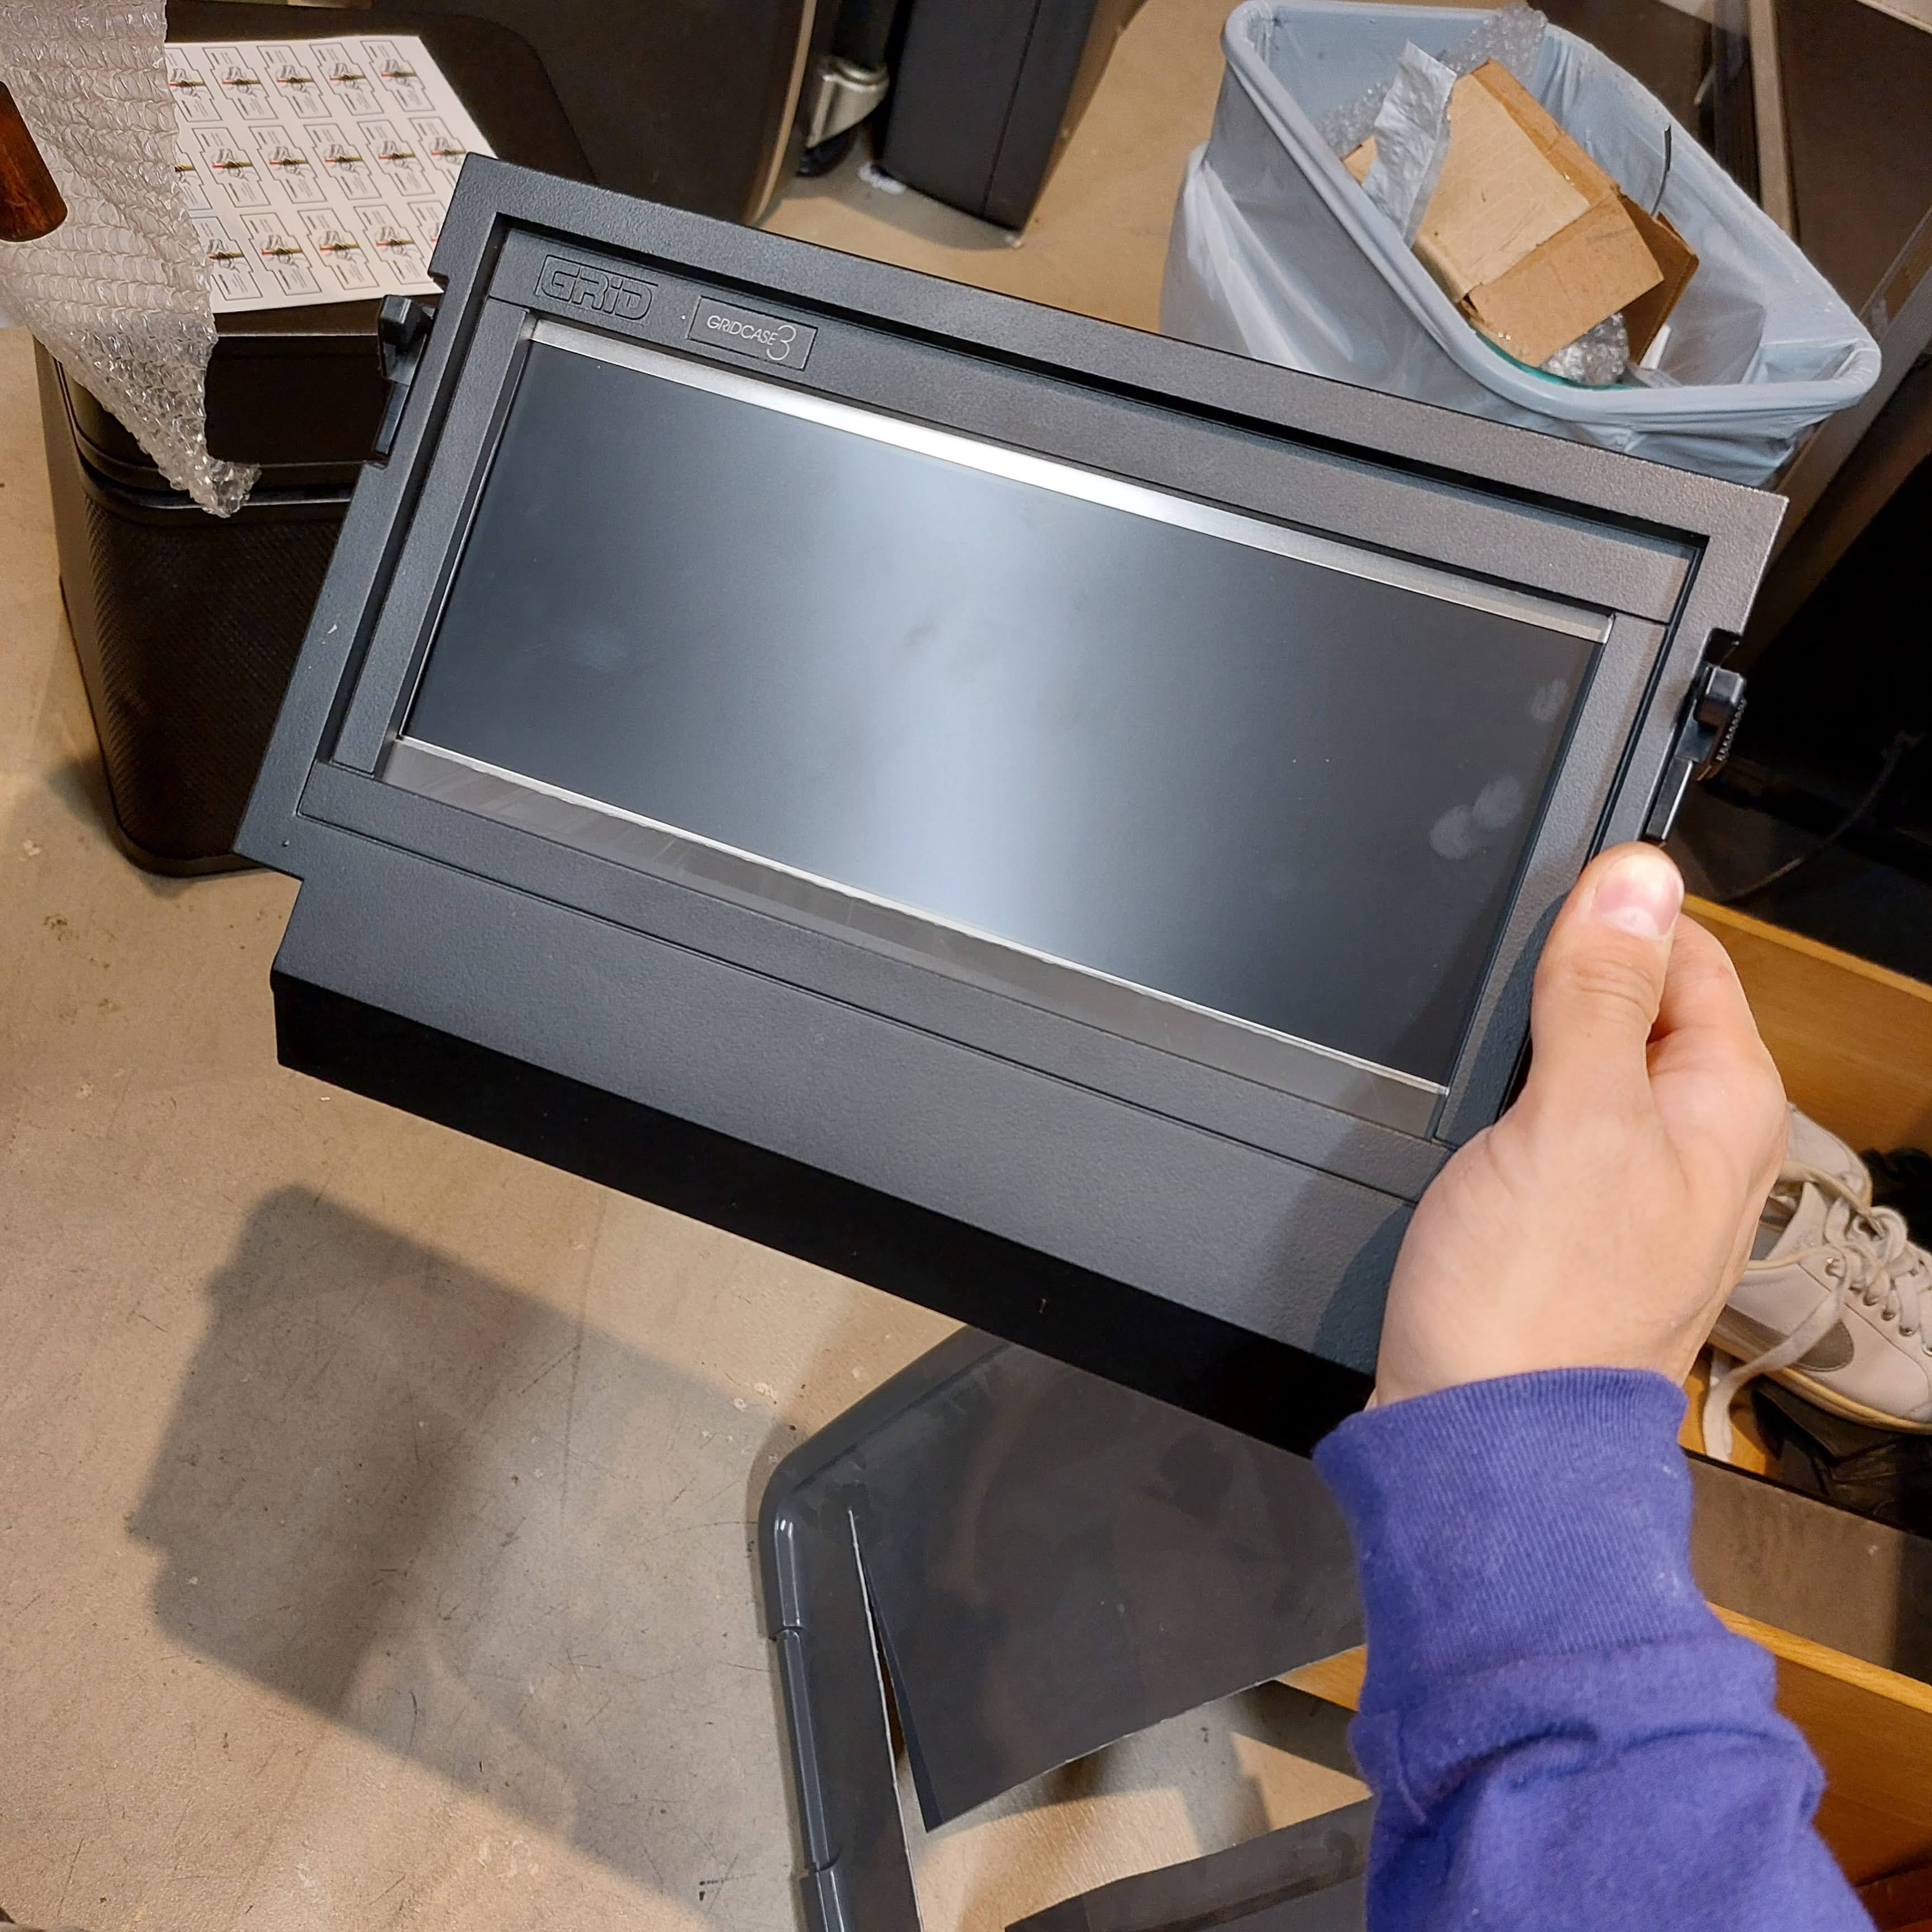
The GRiD when I first got it and cleaned it up.
SUCH a beautiful machine.
I had a keen eye out on a GRiD computer for quite a while, and managed to score this one out of an estate sale for about $300. A painful expense, but quite worth it. It arrived with a factory warehouse label on the lid from it's last owner. It must have been sold to another company once Bloomberg was done with it. The display did work, and I was tempted to use it as I did in my
CRT build, but seeing as I needed this to function as an actual laptop, I decided it would be more convenient for use to use an LCD. That hurt more than the pricetag because I am a SUCKER for cool old displays. Maybe I'll use it in the future. I did consider that watching movies on this wide format would be epic though. Unfortunately the machine didn't boot. Not only was all the software wiped, but it was also missing a few components and the entire interior was rusted over. I did get one introductory line of text for the BIOS on the screen, but it beeped incessantly the entire time with this ear-piecing screech.


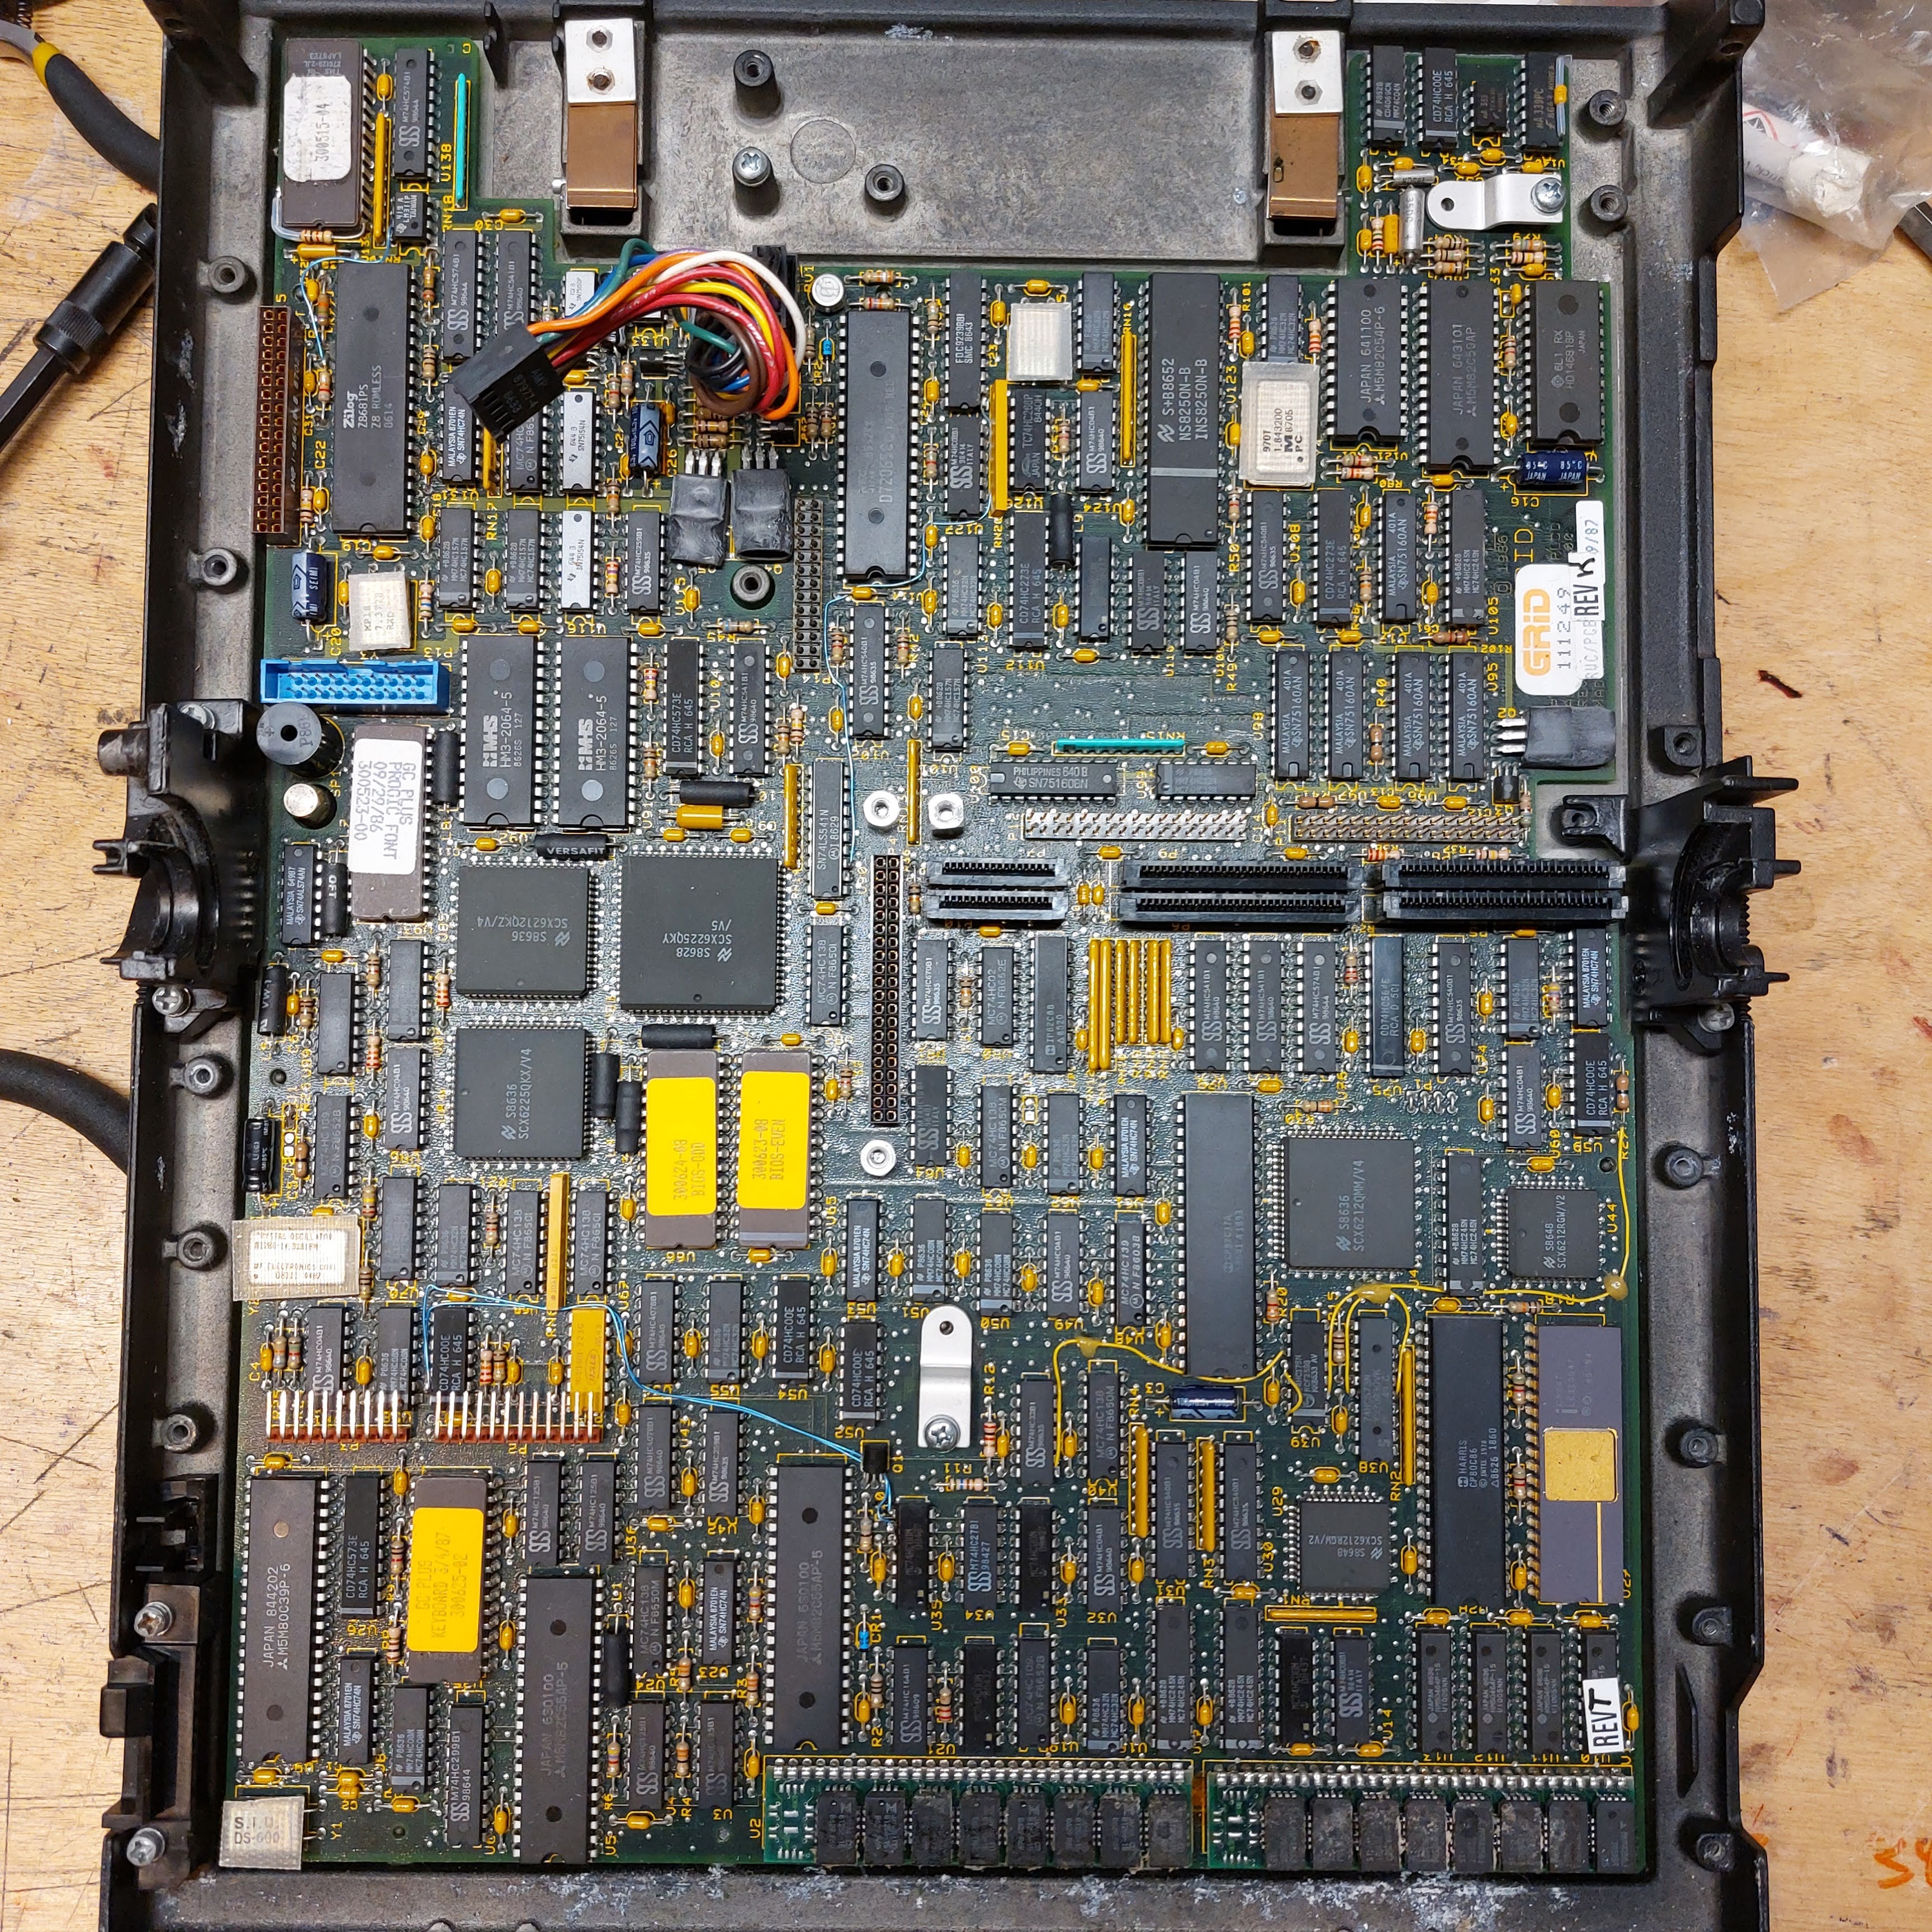
motherboard was pretty clean, running an 8084. Set aside
for something else, maybe.
These things are super easy to take apart, with only four or so screws to access all of the internals. I carefully removed all of the insides and set them aside. They can either go to revive other GRiD computers if someone needs one, or be put back into semi-working order (assuming by some miracle I can figure out why it was dead). I really wanted to salvage the floppy drive, but that was not working properly and I didn't have the room. I use floppy drives on my desktop for document backup, and it would have been nice to use for file transfers. Oh well, I suppose I can rig a USB one up for external use. I also wanted to retain the serial and VGA ports, but those can still be added in future expansions.
The first thing I did with everything out was to cut the rear fan grill out of an old microwave door. Then I soldered pin cables to a teensy 4.1 and routed the other end right into the keyboard. It was super handy as the keyboard also has pin connectors.
I also took some time to mount the screen with some screw-in tabs.
also mounted the mini ergo touchpad and LCD control panel
The guts to the build were more interesting. I used an Intel Nuc, and i5 based micro PC with expandable m.2 ssd slots and sodimm ddr4 ram. I went basic and did 8gb and 500gb since I didn't really need something super powerful. I ditched all the external components and auxiliary boards on the PC and de-soldered the power switch. I wanted to be able to boot this with a key, like a rocket launch panel or something.
First test just to make sure it would work before
destroying the switch.
it worked, here's the keys
First test with the power supply (19v)
First test of the 19v - 12v stepper
self explanatory
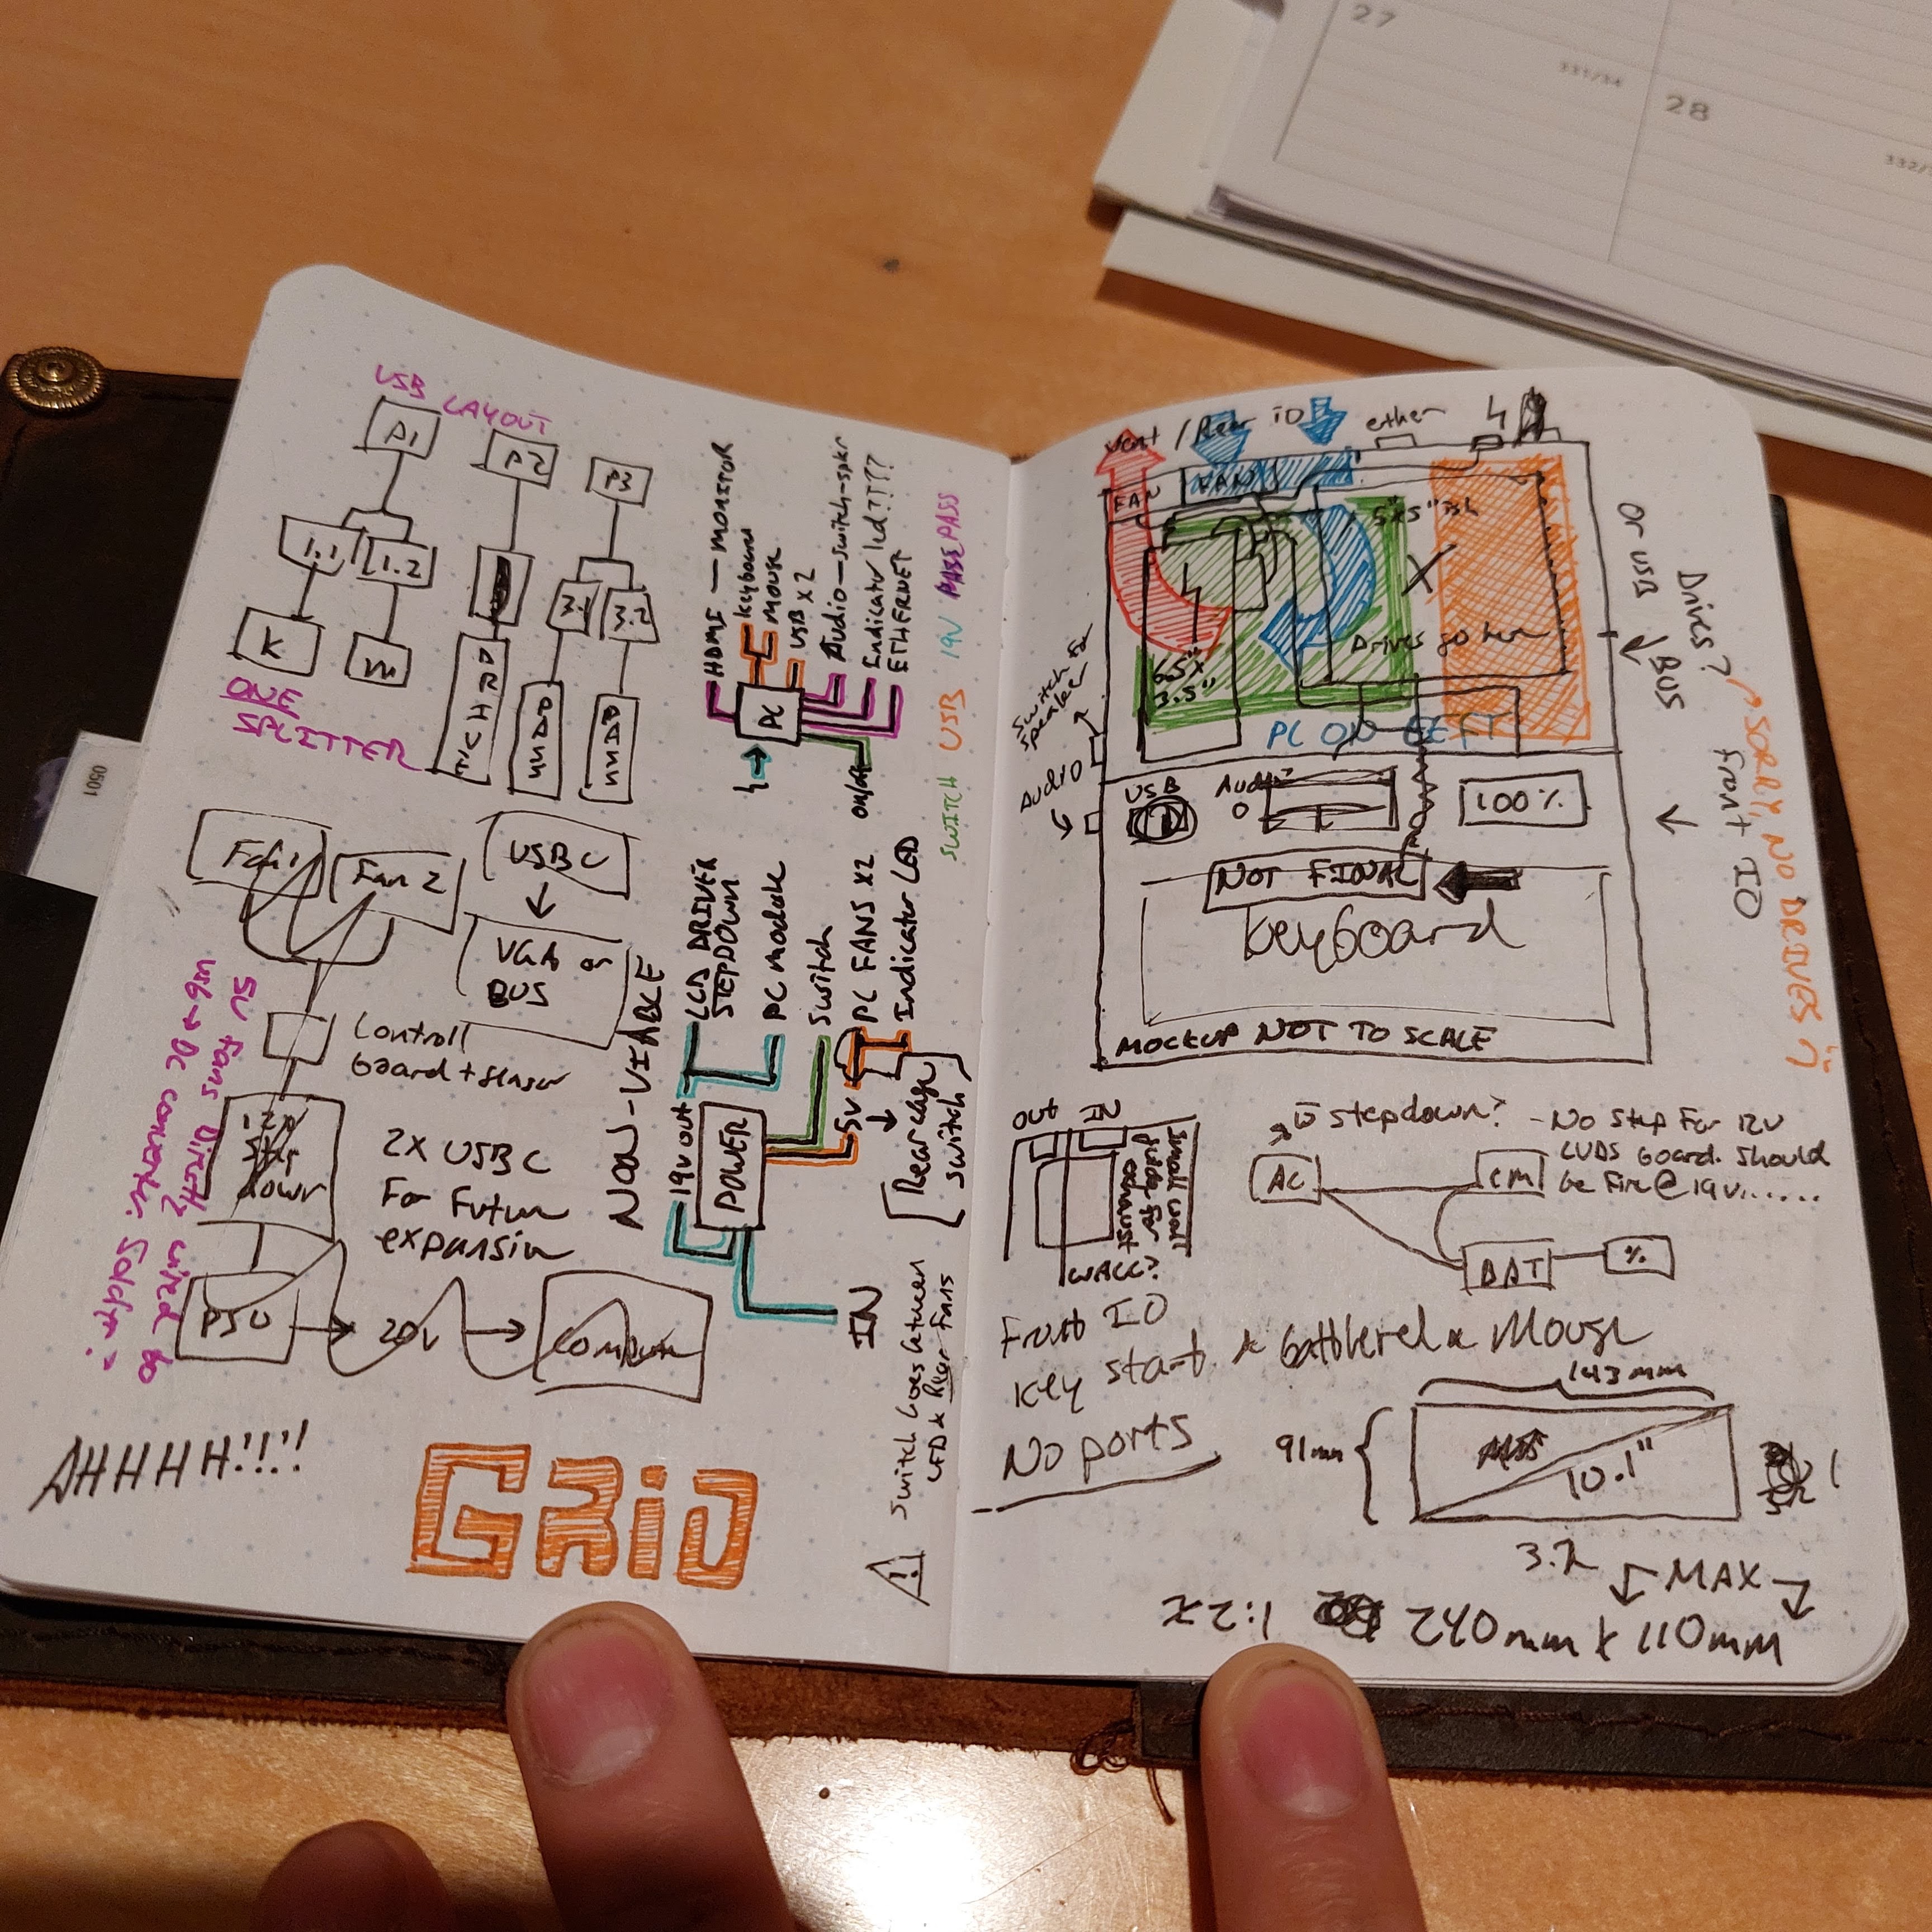
Once the new leads were soldered, I also had to solder a custom DC jack. I think now is the best time to show all the notes and diagrams I drew in my tiny notebook. People on Reddit seemed to also love my fountain pen. A rotring 600 from the mid 80s. I like to be period correct. Scored a good deal on it too, about a third of the usual price.
part list
initial wiring
IO mapping
more IO
Random reminders.
So basically, I wanted this entire thing to be powered off of a standard 19v power supply. I had a DC battery pack that I wanted to mount internally, but it turns out it didn't fit. So I velcro mounted it to the bottom of the computer. It fit nicely, there is a kickstand that you're supposed to use to give the keyboard the optimal tilt, and that allows for just enough room for a 19v dc battery that gives about 4 hours of light use. The power goes right into the original rear mounted DC power jack, and that splits off to the Nuc, and to a 12v stepdown. The 12v stepdown branches off to power the LCD driver, and then to a 5v step down to power the two rear fans. The fans are controlled by the original power switch to the computer, the Nuc is controlled by one of the two key switches, and the LCD is controlled with the mounted button panel. I have an additional key switch for optional power switching (later expansion) and a toggle switch to switch from headphones to speakers (also a later expansion). The keyboard goes to a USB splitter which also accepts the ergo trackpad (PS/2 to USB) and the two other USB 3.0 (and the ethernet) are mounted to the side IO. I custom soldered a 3.5mm audio jack for the side panel as well. Around the back is a thunderbolt/USB-C mounted for external display. The second USB-C on the Nuc splits to two capture cards. One for AV and one for Audio only. I use a LOT of older equipment (cassette, reel to reel, camcorders, vhs....) and I wanted RCA inputs around back. The red and white audio are grounded to the same pin for both capture cards and channels, and it works really well. The AV capture card is more video focused, so for digitizing analog recordings and such, I have a designated audio card that can be swapped over in software. Super helpful since I've lately been recording audio for my YouTube channel on tape.

12v leads soldered directly to the LCD driver
first assembly
All power systems in place.
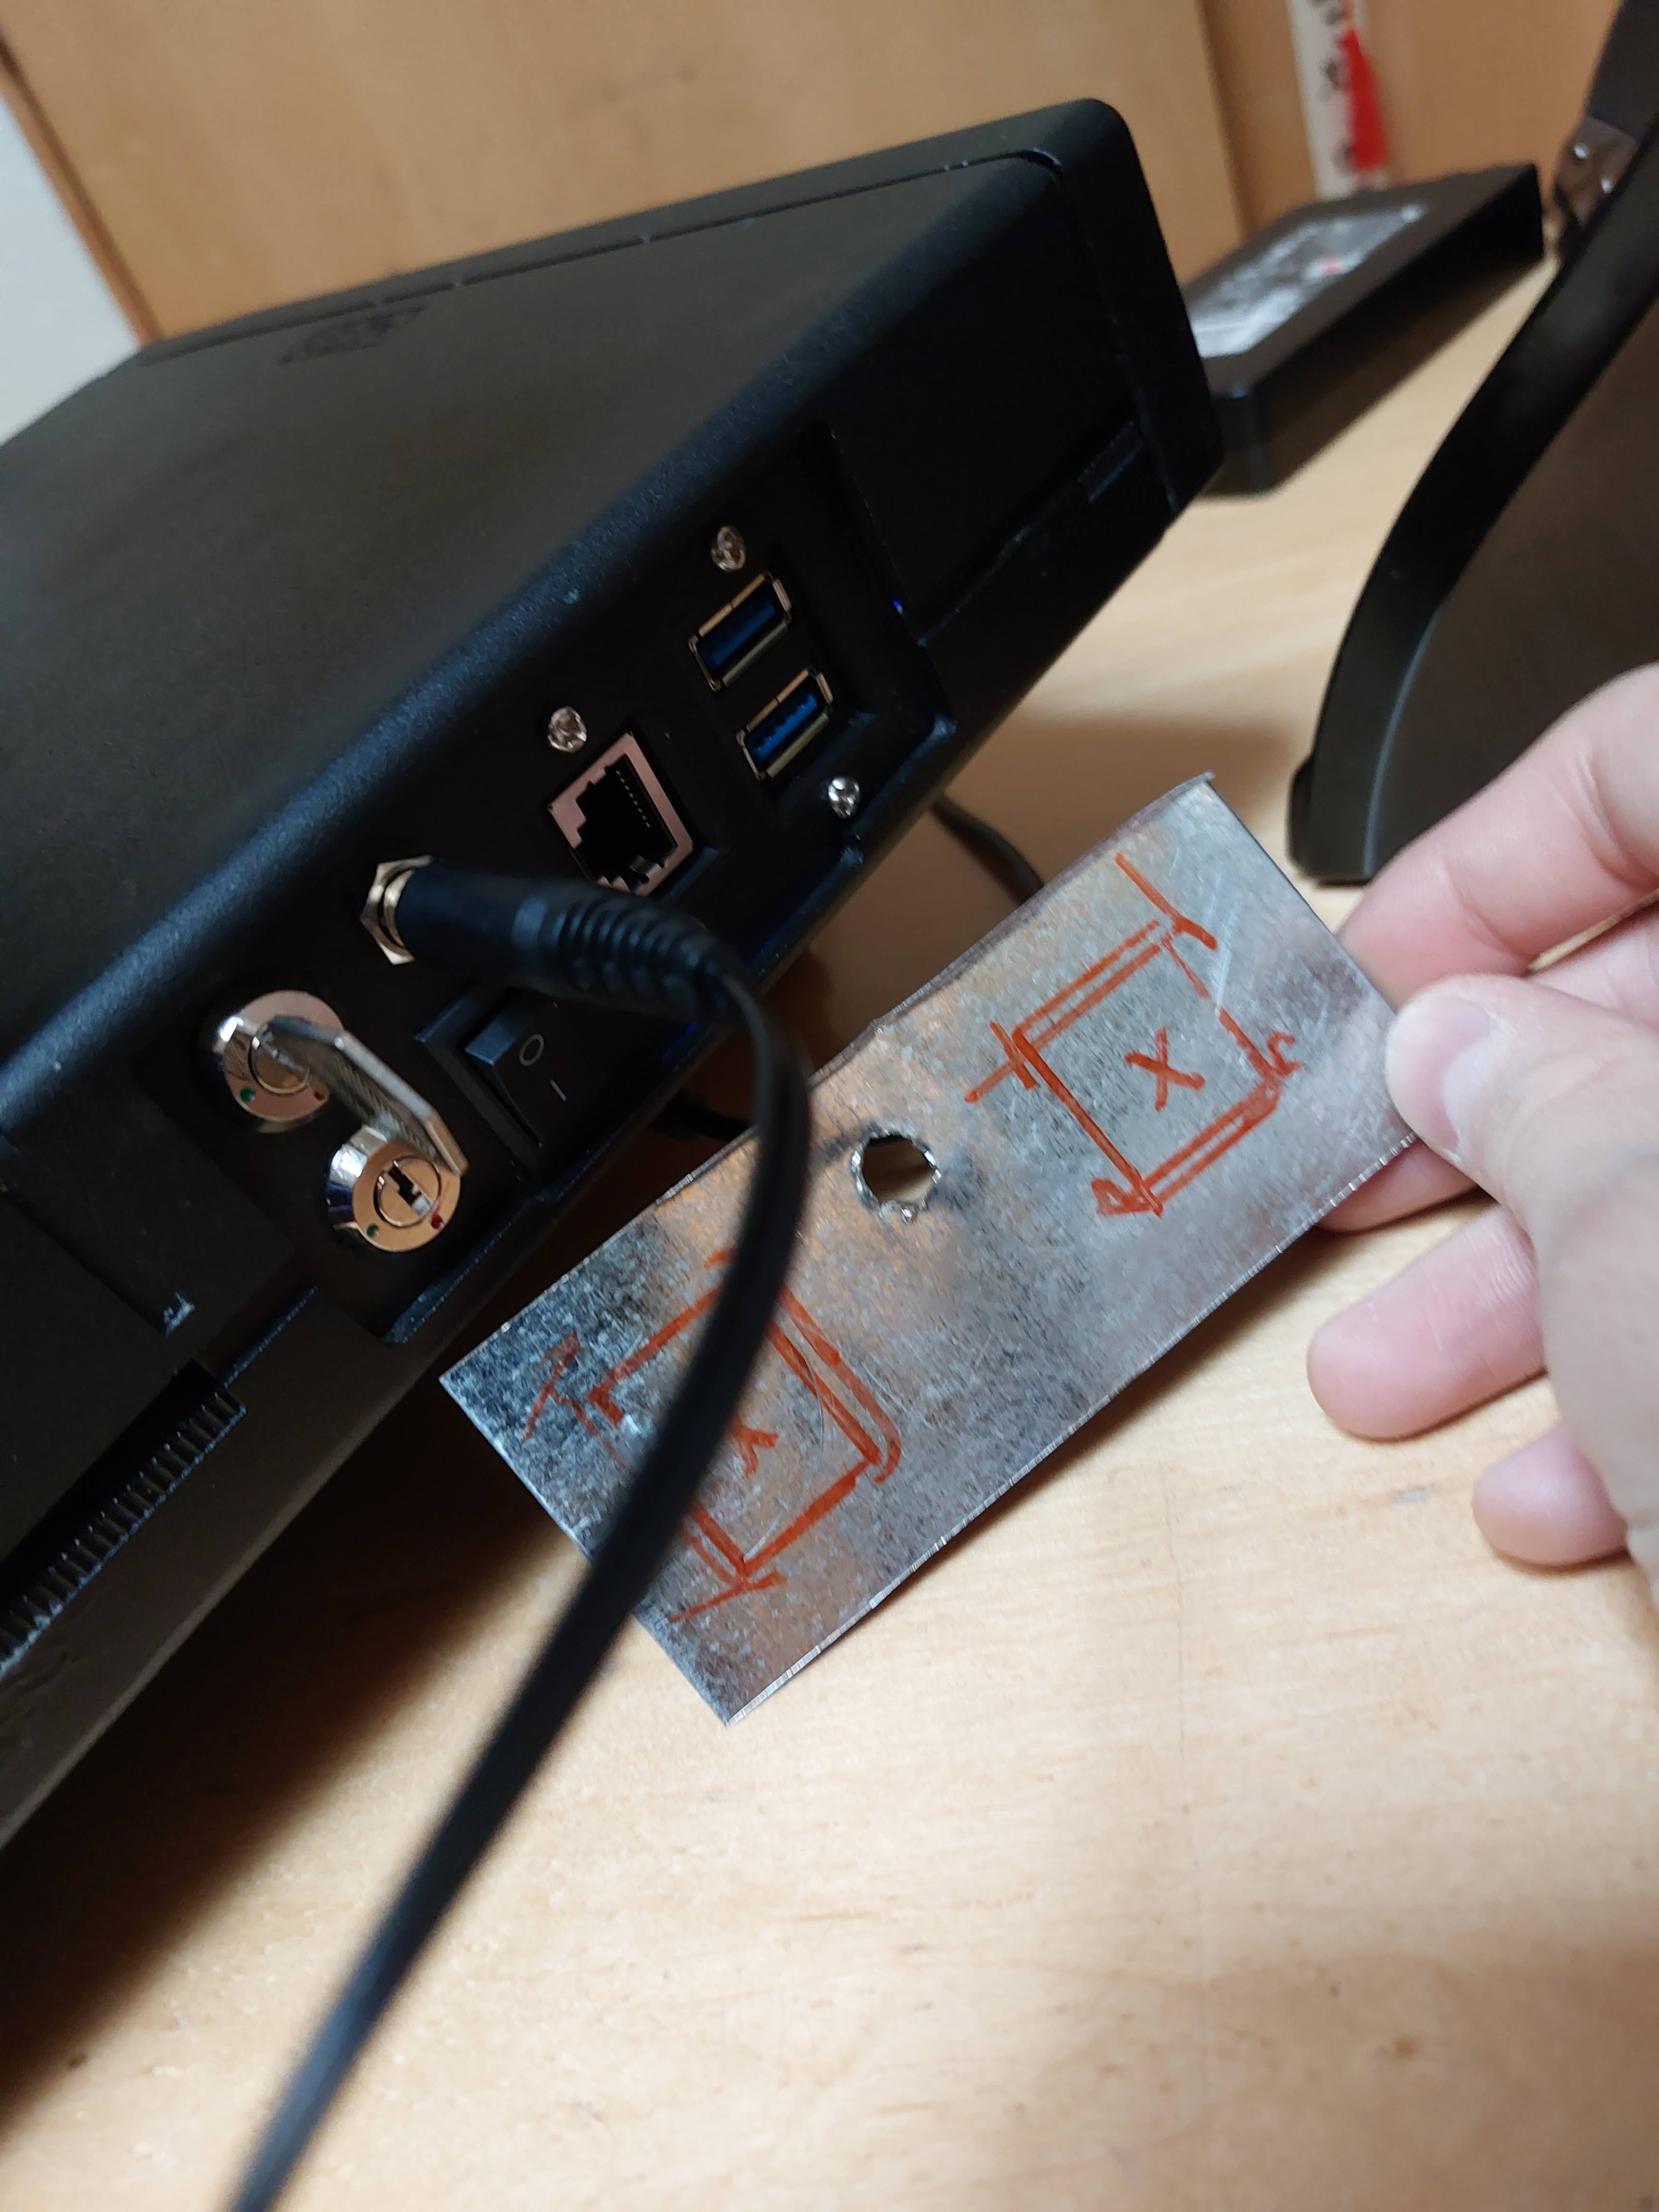
The side IO panel was going to be made out of steel. While working on it, the part got away from me and ripped open my finger. Blood everywhere. That's a regular occurrence for me. Just last night (at the time of writing this) I tried to use a pair of scissors to open a bottle of root beer. That was stupid. My finger has yet to stop bleeding, I think I hit the bone. Of course I used those old steel scissors that are like straight razors. Anyway, I got the part 3d printed instead. Looked nicer than I would have thought. Using the original motherboard standoffs, I rigged up a couple brackets to hold it in place.
Sooooo clean (yeah the USB plug is upside down, I fixed it.)
The keys make this build
routed wires.
the disaster panel. I gave up pretty quick.
Alternatively you could say I got injured pretty quick.
Once the major plugs were routed, I turned to the display. I needed an extended 60 pin FPC connector which took forever to ship from China (SpeedPak is soooo slow). The driver board would not fit directly behind the display, an error which caused me to damage the first panel. I also needed to extend the cable that connected the button panel from the keyboard frame to the driver board. I soldered pin connectors and routed it through the right side hinge.
gotta get a little bit of the gay in there.
looks like shit. don't care.
At this point, the excrement hit the spinny blade machine. There was a short. Luckily the power stepper cuts down the voltage if there's an issue. A few of the wires inside melted. I couldn't figure out what the issue was for the longest time, but apparently the LCD backlight power driver was shorting out because the pressure of the screen case being close caused the pins on the back of the board to short on the metal LCD casing. Something fried, and the LCD screen has a white halo that goes away after 20-30 minutes. At first I thought the halo was delamination from pressure, but after replacing the panel, I now think it is an issue with damaged boards. I am waiting to get those replaced, could be another month. I re-routed the boards to sit lower.
The melty-melts
the "asdhfa jsdfaklsdfklasjdf" moment
The other issue I had was with the HDMI cable. I couldn't find one that fit within the case. Luckily, I discovered that there were special ribbon cable/low-profile HDMI cables made for drones, and that fit absolutely perfectly.
these two shots still show the crappy HDMI cable that didn't
quite fit.
don't have a pic of the new screen layout. I'll take one when I update
the driver boards.
At this point, the build was basically done. I could dual monitor if I needed to, and it was looking pretty flipping fantastic. Has wifi6, so it connected pretty well, even through the solid magnesium-alloy case.
Rear USB-C
Dual monitor test (halo goes away after a while)
Rear RCA Jacks and power cable.
Lately it's been working pretty well. There are a few glitches here and there, but I'm okay with that. I have a nice desktop that does 90% of my needed tasks. Sometimes I just need a portable computer, and this does what I need it to. Absolutely love working with it, it looks really really cool. People keep asking to buy my projects. They aren't for sale. Butttt if you bribe me with obscene amounts of money I'll consider
making one for ya.
A FINAL look at the guts.
Total rat's nest.
So, yeah. This has been a pretty awesome project and I'm super happy with the way it turned out. Super super thankful for all the help and custom code that Frank wrote to get this weird keyboard working. There's a lot of custom keys mapped for things like screenshots and page movement for things I like to do. Shift works as it should, and Code is used to type the punctuation. Cool to have native keys that type the Yen and Pound currency symbols! Also satisfying to use the giant Cancel button as a delete key. So, there's my laptop. Hope you enjoyed reading about my journey in creating it! Lots of head-scratching, hairy moments, and just grunt work. I think it turned out nice. Hope I can figure out that weird display issue. Also, super cool to have RCA jacks. Love it. Best to all of you guys! Thanks for the Reddit support on this project AND my CRT build which
Hackaday covered :)
This image and the one below were taken on my
Hasselblad. ISO is pushed way high, but the colors
do look better than my Sony A7RII which are the last
three photos.
UPDATE: September 2023
Added a new power method to make things simpler. A push button instead of a key switch. The lower key switch disables the push button to lock it. Also has a quarter inch mono output jack now for connection to audio systems.
EDIT AGAIN:
Cut some new plastic borders and painted them. They're the perfect size, color, and finish to help the screen blend more seamlessly into the case.


Wow. I'm impressed with your skills. I'd never heard of this computer—pretty cool!
ReplyDeleteNice repurposefulness! Hey, I see a proof copy of a Williams book back there in the background :D
ReplyDeleteYes! Something exciting is coming!!!!
DeleteNice Post
ReplyDeleteI recently bought Cheapest Used Laptops Store in Noida
a used laptop from eazypc and it's been working perfectly. The laptop was exactly as described, in great condition and at an unbeatable price. The customer service team was really helpful throughout the entire process and made sure everything went smoothly. I'm grateful to eazypc for helping me get the perfect laptop for a fraction of what I would have normally paid
Best Online Scrap Service Provider in Delhi
ReplyDeleteAn inspiring blend of retro charm and modern functionality, this GRiD systems laptop transformation captures the essence of innovation in the world of vintage computing Scrap Buyer In Hyderabad
ReplyDeleteSocial bookmarking sites are online platforms where users can save, organize, and share web bookmarks. These sites help manage personalized collections of links and access them from any device with internet access. Here’s a list of popular social bookmarking sites:
ReplyDeleteReddit: Community-driven platform with user-submitted links, text posts, and images, organized into topic-based subreddits. Users upvote or downvote content to determine its visibility.
Pinterest: Visual bookmarking tool where users create and share collections of images and links called "pins," organized into themed boards for inspiration in areas like fashion, recipes, and DIY projects.
Diigo: Offers bookmarking, annotation, and research tools. Users can highlight and add sticky notes to web pages and PDFs, organizing and sharing their findings.
Pocket: Focuses on saving articles and videos for later viewing. Users can save content from browsers or apps, tagging items for easy organization and retrieval.
Delicious: One of the first social bookmarking site list
, allowing users to save, tag, and share bookmarks. Despite a decline in popularity, it remains a straightforward tool.
StumbleUpon (now Mix): Discovery engine that helps users find and bookmark web pages based on their interests. Mix continues StumbleUpon's legacy with curated content collections.
Flipboard: Content curation platform that aggregates news, stories, and social media updates into a magazine-style format. Users create "magazines" by bookmarking articles to share.
Digg: News aggregator with a curated front page. Users submit links to content, which can be voted up (digg) or down (bury). Popular content rises to the top for easy discovery.
Pearltrees: Allows users to collect, organize, and share digital content, including web pages, photos, notes, and documents, using a visual interface with "pearls" (bookmarks) and "trees" (collections).
These platforms enhance the ability to discover, curate, and share information across the web.
Great article. I recently got Free Laptop with EBT.
ReplyDeletehp victus Is a nice laptop
ReplyDeleteNice Blog
ReplyDeleteVisit Our Best Computer Repair Services in Uttam Nagar
This is such a unique and impressive project! The blend of vintage and modern tech is amazing, and the attention to detail is top-notch. If you're into repairs or tech upgrades, you should check out fixnvibe stirling pc and phone repair services. We specialize in bringing tech back to life!
ReplyDeleteIt seems I can't directly access the blog page at the moment. However, I can help you create a comment based on the content or theme of the blog. If you can share some details or key points from the post, I can craft a relevant response for you!
ReplyDeletebest regards
starlink alternative australia
Great read! It's amazing to see how far technology has come since the 1980s Grid Computer. For those who need modern solutions without buying, Laptop Rental is a smart, cost-effective option for work, travel, or events.
ReplyDeleteGreat retro tech throwback! The Grid Compass was revolutionary. Today, Laptop Rental makes cutting-edge tech accessible without long-term commitments. Cool post!
ReplyDeleteReally enjoyed this nostalgic dive into 1980s tech! It’s wild to see how laptops have evolved. These days, with options like Laptop Hire Dubai, getting the latest gear is easy without the big investment. Perfect for events or temporary projects!
ReplyDeleteIf you’re working remotely, a portable monitor
ReplyDeletefor your laptop is a must-have.
Boost your multitasking on the go with a Laptop Screen Extender for dual or triple screen convenience anywhere.
ReplyDelete"Fascinating read! It's amazing to see how far laptops have come since the 1980s. The GRiD Compass was truly ahead of its time—thanks for sharing this nostalgic tech insight!"
ReplyDeletebest regards
NBN vs OptiComm Internet
Boost your productivity on the go with a compact and easy-to-use Laptop Screen Extender.
ReplyDeleteA Portable Monitor for Laptop is the perfect solution for boosting productivity and multitasking anywhere you go.
ReplyDeleteInteresting post reflecting on the evolution of laptops and early computing systems, showing how far technology has come since the 1980s. Today, flexible solutions like Laptop Rental Dubai make it easier for users to access modern, high-performance devices without long-term investment.
ReplyDelete