1895 Williams 1

I can't believe I finally have one

Taken on my Nikon F3, pushed kodak Ektar

The Williams has always been personally regarded as one of the most beautiful typewriters ever made. Not too long after I first got into typewriters, I unlocked the world of pre-1900 machines, and was never the same. It wasn't long after owning my very first machine, a 1930s Royal Model 10, that I came across what I regarded to be the best typewriter ever made. The 1930 Royal Portable. I had seen hundreds of machines, but something about that one in particular called itself out to me, and I never thought I'd find better. I first saw the Williams typewriter in a news video discussing the collection of Martin Howard, I remember thinking to myself, "damn, wouldn't it be amazing to own that machine?" Martin's description troubled me though, as he mentioned that it was one of the rarest of rare machines, and that equated a hefty price tag. But the radial design, and the curves and the decorations, and the symmetry of the fans, everything appealed to me, but I never thought I would have to opportunity to own one. At the time, I never intended to own any more front strike typebar machines other than my two royals. I had wanted to grow a collection that was solely uniquely working machines. My initial interest in them was more purely mechanical. However, as my collection slowly grew, I found myself unable to find these rarer type machines, so I settled for owning some nice examples of more modern ones, resigning to the fact that I may never have the collection I wanted. That was until three years later on April 2, 2017. Youtube Chanel Typewriter Passion publishes this video: The Williams 1.

I'm gonna need to take a similar shot on medium format
and blow it up into a poster.
David's video was one of the most spectacular things I had ever seen on the internet. In his video, he shows off this beautiful machine in perfect working order, and set to the violin cover of the Stranger Things Theme song. I had never really seen people type on these machines before, and I was captivated from the very beginning. From that point on I started very seriously searching for one to call my own. I knew I had to have a Williams. My collection grew from there, with thrust action models like the Klein Alder 2, and the more notable such as the Hammond 12 and Multiplex, but the Williams always eluded me.
Last summer a model 1 sold on ebay for $750USD. It was in dire need of a lot of restoration work, but was purchased by the very talented Erik Lukomskiy. I had also placed a bid on the machine, for $600.

Very early 1895 model, straightened glass keys.
My jealousy ran thick.
After that, all was quiet on the market, until my friend Jonathan Posey tells me he has found a number four in an antique shop for $350. A number four, maybe. I was more interested in the 1, but would have settled well for a 2. I began bidding on a number four from Live Auctioneers, but dropped out of that one. It went for $550. Instead, I focused my attention (losing sleep) on an eBay auction for a mint condition model 2 at the end of January. Sadly, I had to stop as it surpassed $2700, surprising nearly everyone. A few weeks later, another Number 2 is listed, and that one sold for $2600. Reaching out to a contact in Italy and inquiring about another 2, owned by Filippo Zazzaroni. His machine was in decent shape, but was the later model released by the Sector company after they bought out Williams. This one was 1300 plus shipping. Filippo shared my dismay, explaining that a good model 1 would easily fetch $4000USD on the Italian Market, and a number one Curved would fetch $6500. My final stop was Nick Mooij from Amsterdam. He had a number two, and it sold for around $1100. Very dismayed at the current outlook of owning one for myself, I was very excited to get a text from fellow collector Joshua Dimora. Joshua is also an avid collector of antique tractors, and had found one he was eager to purchase, and thus needed to raise cash. He offered me his Williams 1, as well as a Williams 1 parts machine, and we struck a deal. I was ecstatic. After all this time, I was finally going to get one for myself, even though it was in dire need of restoration. After all, that would be the only way I could afford one.


the carriage isn't actually attached.
It was gonna be a project for sure, but a worthy one. I'm not one for cosmetic repairs, but I was sure I could get the machine working well.
the Williams Typewriter
So what was the Williams Typewriter Company? I feel like I should discuss this further, since very little information is available about these machines. I want to discuss the unique mechanics, the history, and finally my own personal repair process.

Original Print Ad (one of two)

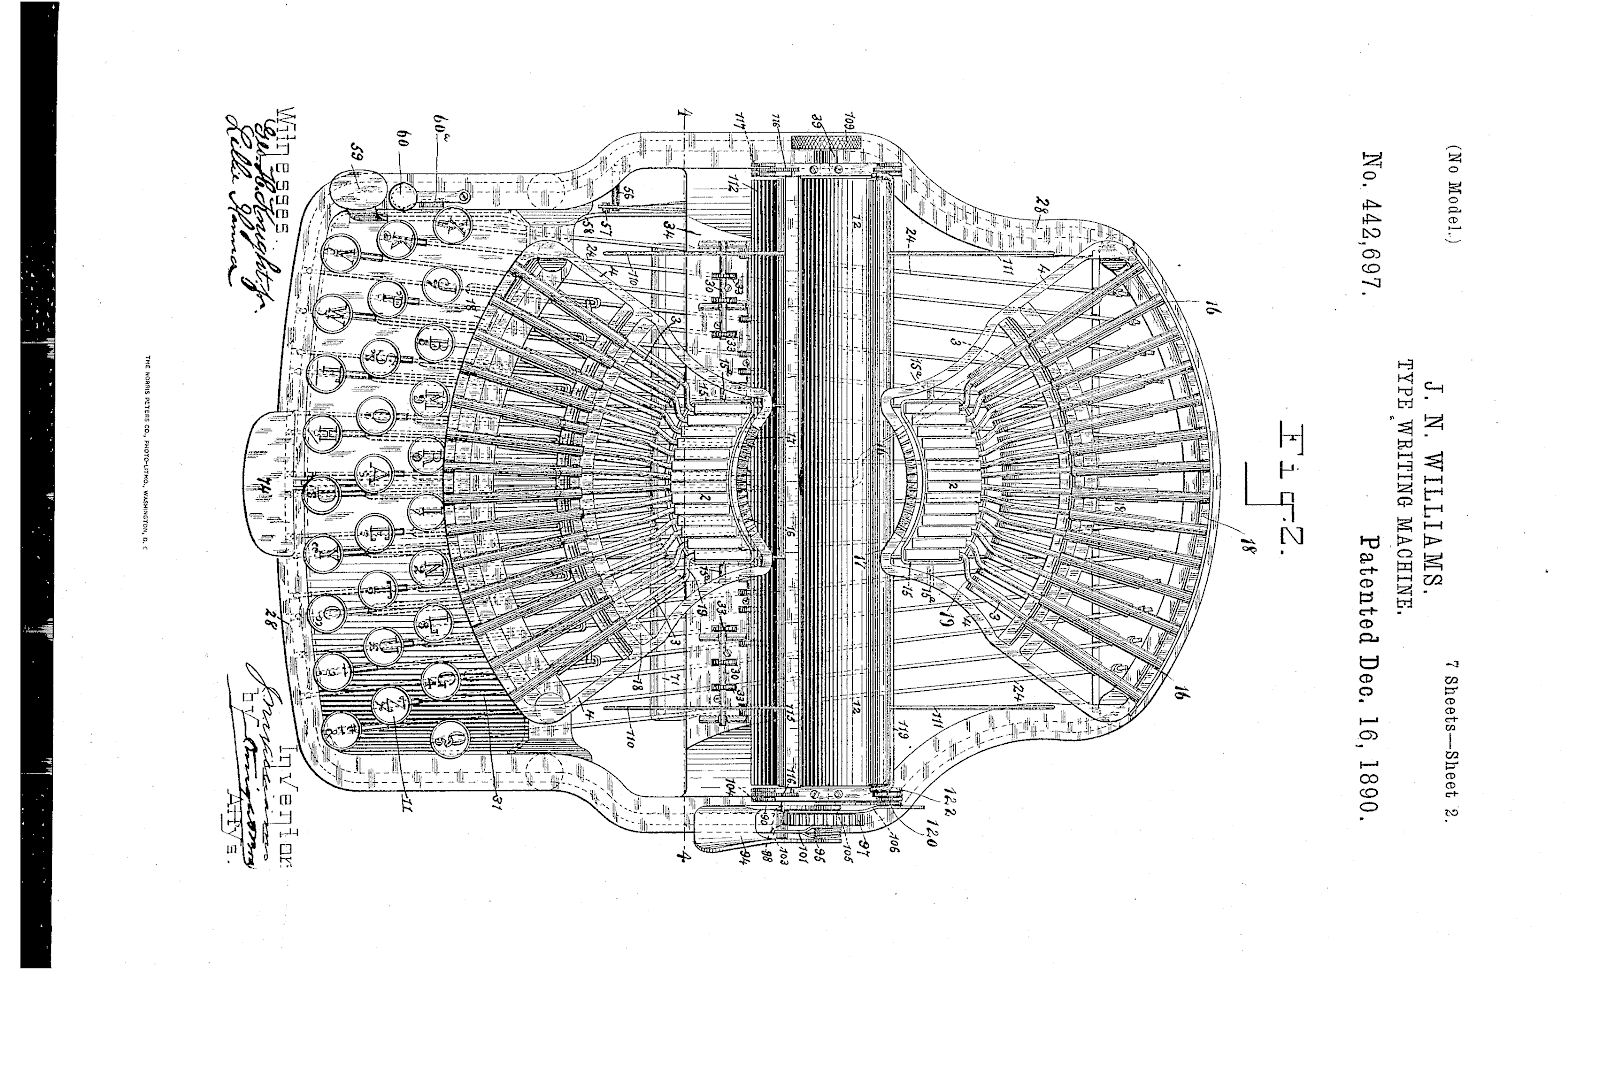
The Williams typewriter was the brainchild of John Newton Williams, a very prolific inventor and Civil War veteran from Maine. The original design for the grasshopper type action was pattented between 1875 and 1879 under Charles Brown from Chicago. Williams supposedly purchased rights to the original patent document for the typewriter, but the available records show that Patent Number US442697 was the first. Williams filed this patent in 1889, and received it in 1890.

US442697
The machine underwent a few changes before production, but the basic idea of the machine was all here. The base and frame work of the original patent work was more straight, with the base being comprised of two offset rounded rectangles. The type bar action did not change. The type attacks the writing line from both ends of the platen, from two spread out fans. The front bars are pulled down by the keys, and spring up and over to strike a letter. The rear bars are pushed up by the key to accomplish the same fluid movement.

Each type bar was stamped with the letter it typed

Here you can see a pretty much mint slug

And the famous grasshopper type. This is a rear fan bar, and
Gets pushed up in the rear section. It pivots up and over the shot dangly bar
Beneath the slug.
In order to solve the common problem of the day, blind writing, Williams forwent the inked ribbon and let the machine rest its type on ink pads instead. The page itself curled up inside the machine, and fed into a receiver end on the rear of the carriage. It was a completely ingenious idea. The major selling point of this machine was its visible type, one of the first successful, followed closely by the crisp print of direct inking.


US501753

Number 1 Curved, courtesy of Max at BestTypewriters
In 1894, Williams built a brand new factory in Derby Connecticut, moving his company there from New Jersey. He operated there from 1894 to 1909. The Derby factory employed 150 workers, and generated an output of around 100 machines a week.


Today, the Williams Factory building houses a
cellular products manufacturing company.
For the first three years of production, the Williams featured a curved keyboard along the same radius as the circular base. The keytops were glass. In 1895, the Model 1 was once again redesigned, and given black or white Bakelite keytops, with glass as a side option (for the 2 as well) and the keyboard was straightened out. In addition to the cosmetic changes, the carriage rails were reinforced to support more permanent alignment. These designs were patented in 1897, two years after production began. The very same design was used in the Williams 2, with an updated escapement system (not present in this patent document), featuring a U spring, and an updated top fan frame. This frame change had a single-faced nameplate centered on the front and rear, with a smooth solid top to the frame, whereas the 1 had a wrap over nameplate that completed the frame contour. This new design also did away with the gold and floral embellishments.
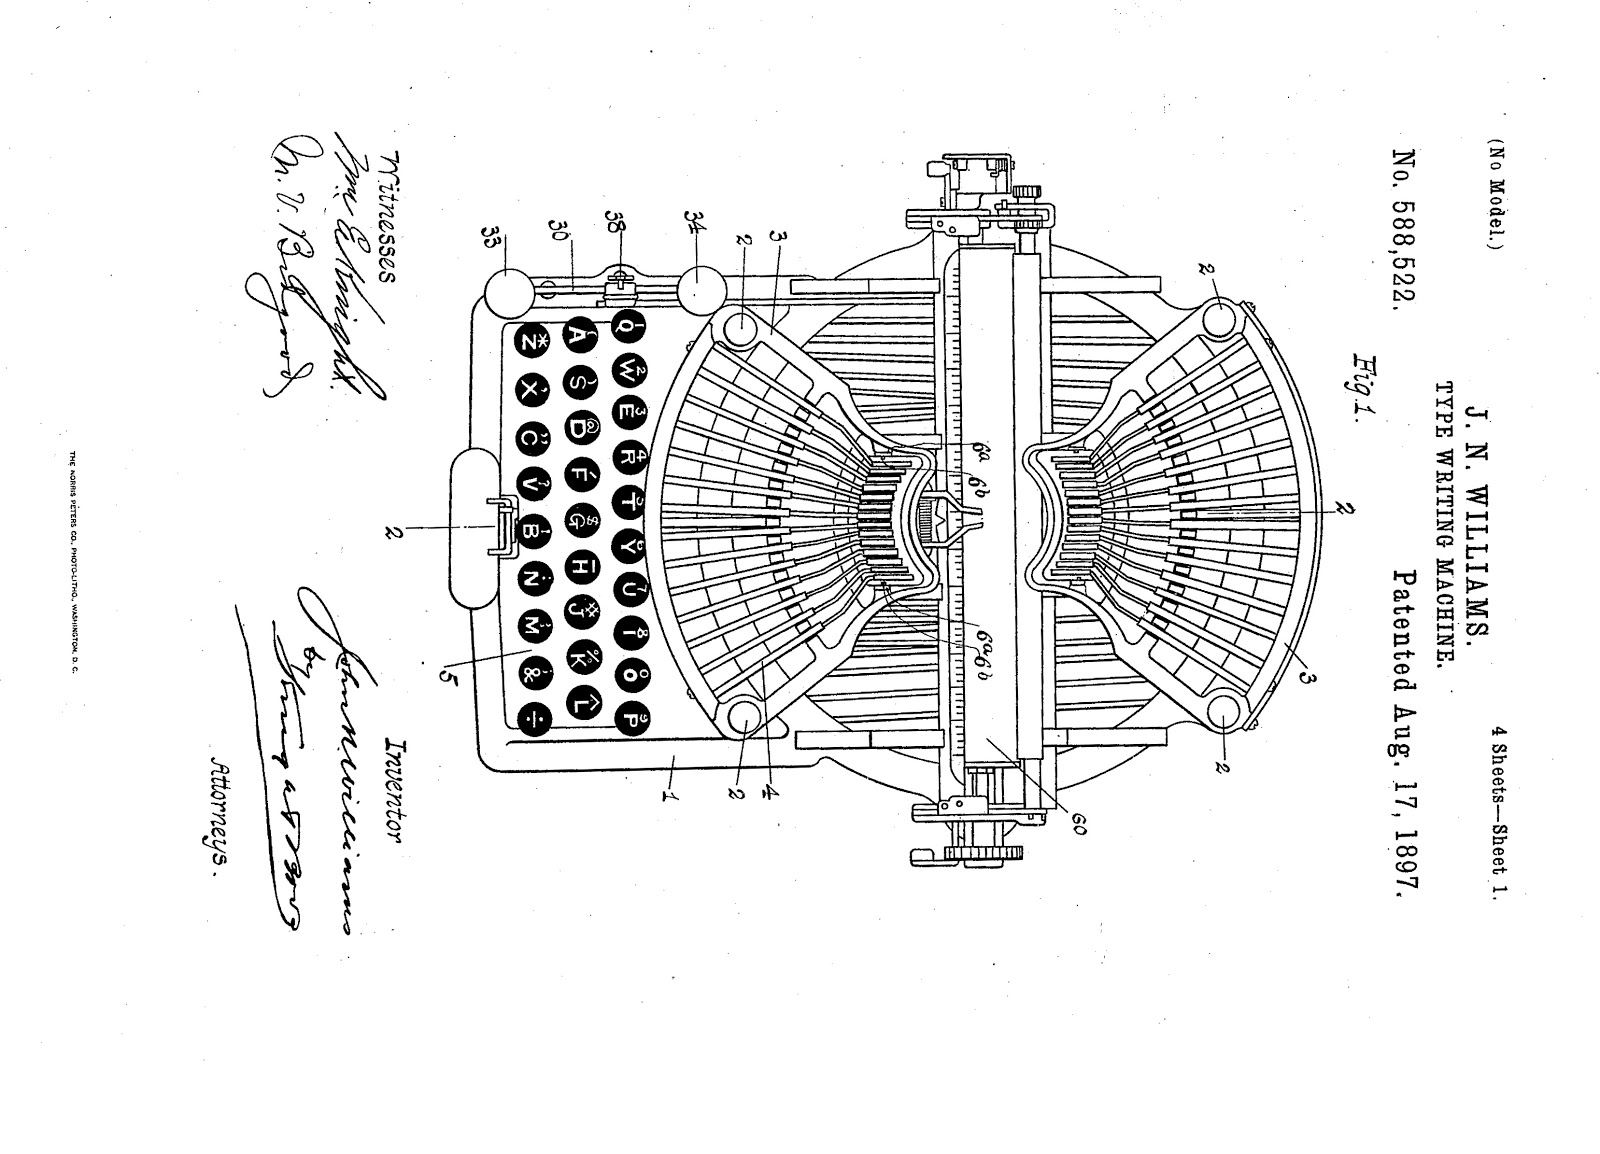
US588522
These changes, as well as the move to a new location were prompted by interest from the British War Department. The earlier tests of the machine, as seen in the previous ad, shows the Williams as one of the best typewriters of its age. Amazing text quality, alignment, and visibility. Why almost no type samples and video footage of these machines are around today, I don't know. I intend to change that. The British War Department adopted the Williams as their official typewriter, and placed a mass order for 3,000 machines. 25 of every 100 machines made were shipped off to London.

Here I have a scan of an original sales receipt for a 2 in 1898.
This information will amend the database for known models
produced in that year. Scan came out a bit yellow. The designated 1 key,
and typeface (the close circle "e" upper W and C and 3) as well as the ink
color discrepancy in the same line, and the lack of telltale ribbon weave
patterns on the edges of letters (as well as the smudge and blotch on a few)
lead me to the conclusion that this was indeed typed on a Williams.


Original Print Ad (two of two)
Both of these lithographs show the Williams with a straight glass keyboard. The over wrapping name plate on the top of the machine tells us that this is a number 1, as the 2 had a single faced name plate centered on the front and back. These ads were most likely from 1895.

Williams 2, Photo Courtesy of Nick de Mooij
Note the Number 2 Decal on the front.

14" carriage model 3
Photo Courtesy of Greg Fudacz (see source)
In 1896, Williams produced the Model 2, almost identical to the model 1, and the Model 3, a wide 14" carriage with a modified frame. The company also manufactured a front facing caps only telegraph machine. This machine only had a single fan mounted to the front, with a frame more similar to the Williams 4.

High res ad scan


Look at that beautiful gold embossed cover.

From the Williams 4 sales manual,
Courtesy of Greg Fudacz
The four bank Williams 4 in 1899 brought many improvements, including the glass keys. It also had adjustable alignment, tab, line lock, margins, margin release, and ditched the Caps and Figure rocker, opting for a single shift machine with more characters. This machine had two large densely packed fans, and a much denser and thicker frame. With this larger frame, the Williams was able to use a wider platen and carriage than the older models, a carriage that was more in line with other standards of the day. 7 and 3/4 was just too short. This longer carriage also included margin settings and tab stops, where the 1 and 2 only allowed for setting the left margin. The machine itself operated much like its predecessors, but instead of a rear mounted feed roller, it had a single front mounted feed roller.

photo courtesy of Jonathan Posey
also note the plastic knob, rather than the rubber
o-ring used by the earlier models.
The 4 retained the same spring tensioned line scale that the 1 and 2 used, but rather than using the rear feed roller to push the paper into the take-up basket, it employed a smooth friction-less chute. This allowed the machine to more easily backtrack the line spacing without causing the paper to bunch up over the platen. The other major improvement with the 4 was a platen ratchet. This allowed for more stable lines of text. In the previous models, a small toothed gear was attached to the end of the rear single feed roller. This served to both index the line as well as a place for the return leaver to grip. The number 4 did away with this, using a platen with a toothed wheel on the left much like any other conventional typewriter. The same is also true with the escapement, the 4 and later 6 used a rotary escapement instead of the compression tooth style one of the early models.

Rotary escapement
Additionally, the Williams had the options for interchangeable plates of varying hardness. This was a feature on the earlier models, but I have not seen it advertised before. Williams also had adjustable type bars to maintain alignment, and boasted the ability to achieve a shocking fifteen strokes per second.


Around this time, the Company also had records of a single fan, capital only telegraph typing machine. This machine featured a front fan with the grasshopper action, and a stationary (non shifting) carriage. It has a similar frame and nameplate as the number 4, but there are no copies known to exist. (please contact me if you have one).

The capital only telegraph typewriter, featuring a single
fan of type bars.
And in case you were wondering, yes. The William's model 4 really was everything it was made out to be. Below is a type sample from the machine on Williams letterhead.


Note the two tier fan frame and leaver. This is a number 6.
The placement of the shift keys differed slightly, but it was essentially the same machine, simplified to be a little more affordable in hopes of boosting sales. This scheme didn't work. As fellow collector and American Typewriter historian Jack Armstrong pointed out to me, the Williams plant in Derby assisted in the manufacturing of the American Model 5 in 1901. Through context clues like these, it becomes clear that the Williams company was struggling financially. In fact, when the two companies parted ways, the American Typewriter Company owed Williams over $99,000–roughly 3 million in today’s money. Yes, the American Company was a leech.

When the company finally fell through, it was purchased by Jerome Sector in September of 1909. Sector continued to produce Williams typewriters, the three bank models introduced as the Junior, subdivided into the Academy and Englewood. In 1926, Sector was sold to Sponge Rubber Products.

the junior, produced by the Sector Company
Note the lack of keyboard plate and wide spacebar.
Photo Courtesy of Filippo Zazzaroni.

Number 4, note the center bell
Photo Courtesy of Eric Lukomskiy
The William's found its way into many many notable places in its 30 year production run. Of these included being adopted by the British War Department as mentioned, as well as serving in the front lines of the Spanish-American War, and on US navy vessels out at sea. According to the Valley Post, General Miles of the United States Army rigorously used the Williams out in the field, and due to its ribbonless nature, the Peninsular & Oriented Steamship company adopted it for use on vessels.
After the fall of the Williams Typewriter Company, the obvious choise for John was to take to the skies. John Newton Williams went on to invent the first Helicopter to fly in the Unites States, along with notable inventor Emile Berliner. Below, Berliner is on the left, and Williams is on the right.


page 4, New York Times, June 30, 1909
As one final point of interest, in 1898, touch typing pioneer Bates Torrey produced in conjunction with the Williams typewriter company, an experimental touch typing machine. Bates was the first person to develop the full finger typing method, as well as an efficient non-QWERTY keyboard layout to go with it. With the help of Williams, he produced a model 2 with a special keyboard. It had three paddles on the front, the central for space, and the sides for figure and caps, with full keys on either side, raised to certain nights conforming to the ergonomics of the hand. Unfortunately for Bates, his developments came too late, and were washed away by larger companies such as Remington, but the idea of full finger keyboarding remains, as does his original Williams 2 typewriter, which was personally passed down from his hands to others. The Bates Torrey typewriter is an excellent example of the innovation that stretched between two great minds.

Torrey’s original layout and the machine

Find the original article these photos came from in issue
111 of ETC.

Here you can see the height change in the keyboard.

An original type sample from the machine in question, using
Torrey’s personal letterhead. The purple ink is in line with the same
color inks used in the aforementioned sales receipts.

As of February 2022, I found this lovely photo of a 1C
taken in a General's office. Posted on Reddit by u/chubachus
the Mechanics
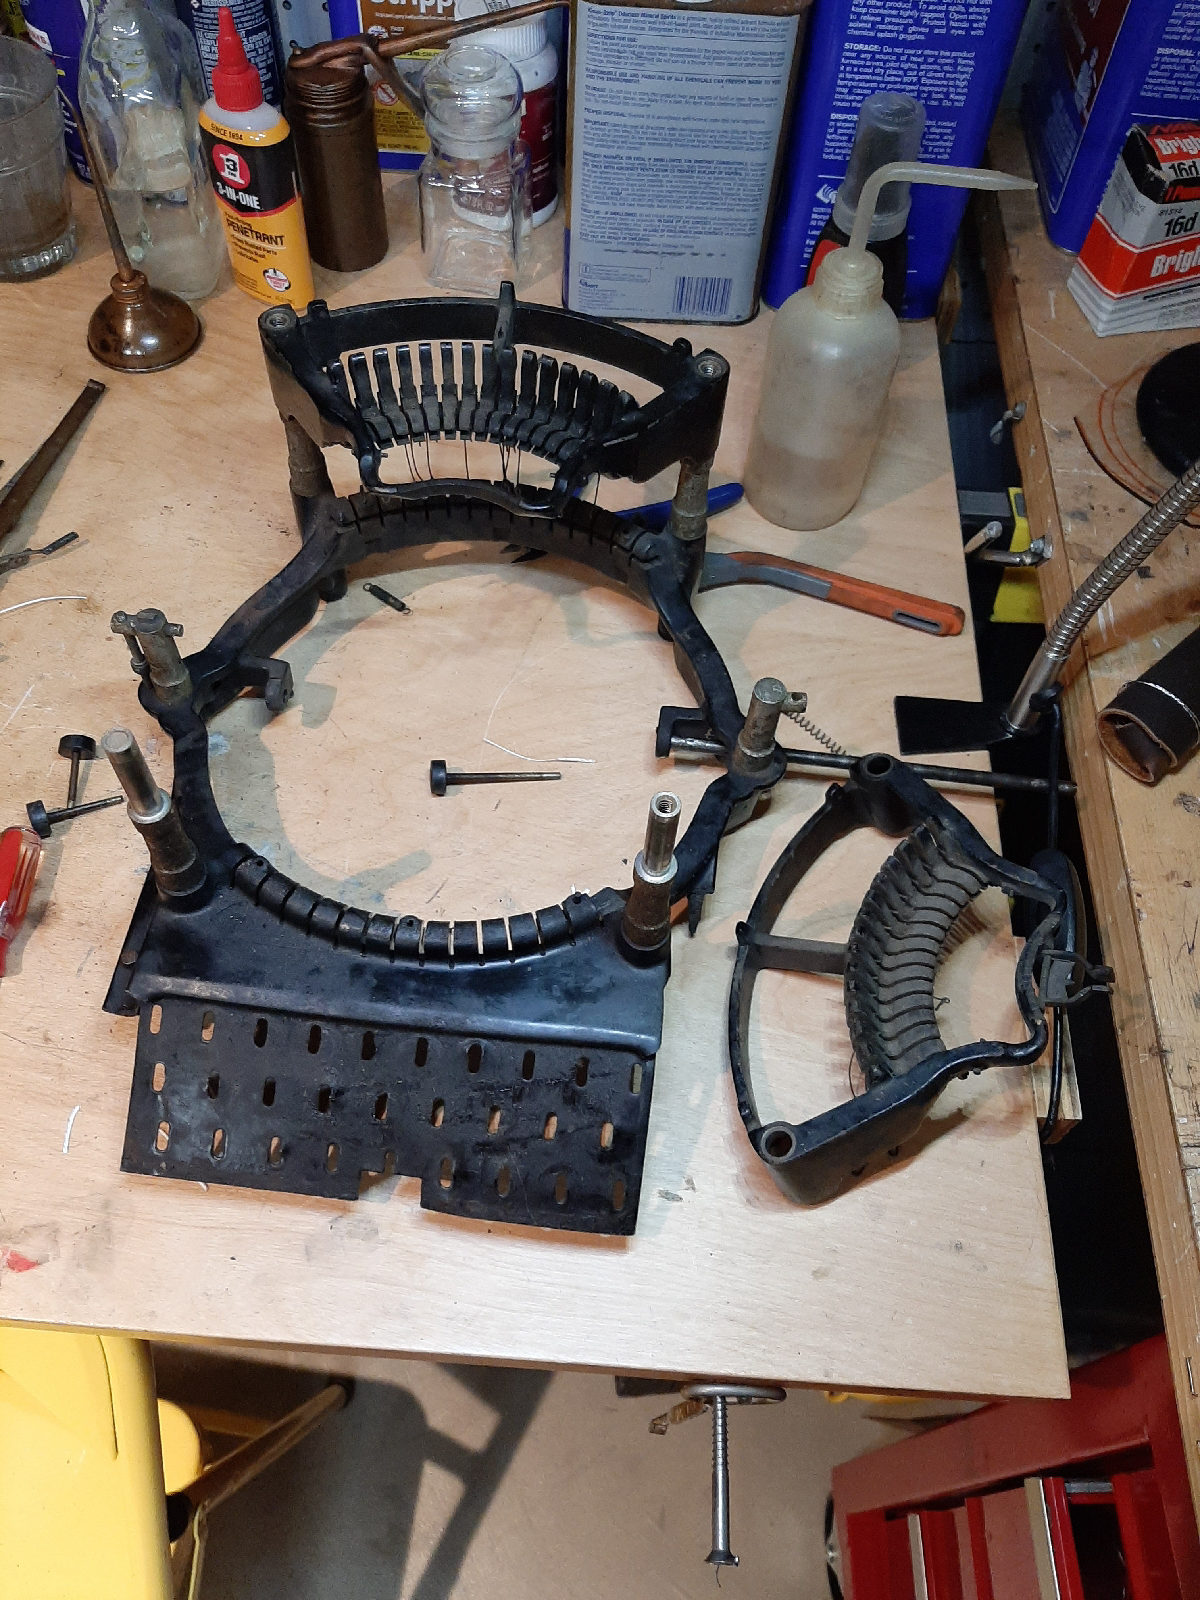
The machine I received did not have an attached carriage. It had a carriage, but it was not attached. The ball bearings were lose, and the bearing holder wasn't there, and neither were the three screws that held the rolling anchor (these are 4-40 thread, same as the screws that hold the chrome bands over oliver type bars). (wrote this as I went along basically, so don't murder me over my tense.)


Some before shots.

first thing I did was hit that nameplate
with some steel wool to spiff it up


As always, the first thing I did was remove any body coverings. This machine was filled with dirt and grime, and lots of rust, but it functioned. I must say, the first time I pressed a key I got shivers. I always go on about the Model P being light to the touch, but damn, this is LIGHT. Aside from the dust bunnies and the singular deceased bee, the machine seemed to be pretty decent. There was some permanent finish damage from the rust, but the machine is 125 years old. I will clean it so it isn't dirty, but this machine isn't going to shine.

The inkwells are held in place via spring clips, they drop out from underneath with extreme ease, designed to make replenishing and changing ink a breeze. The pads themselves were dust, they disintegrated as they fell out of the wells. I cleaned them, and replaced them with a dense foam pad. I'm not sure how it'll take the ink, but the next step will be cutting up an old stamp pad.


Notice that the front pad is labeled front. The rear pad has no labeling, and sits a little higher up than the front one. This helps give the rear slugs a little bit of a boost when they come up to hit the platen, since they are pushed up rather than pulled. The difference is very slight, and won't cause major issues if not installed right, but just keep that in mind. I'm using an oil-based stamp pad ink in a roller bottle that I got from Office Depot here, and that didn't work out too well for me. Instead I cut out some sections from a gel stamp pad, and it works alright.
Note: If the pads are too low, the keys are a little stiff. If they are too high, the keys stick. The ink pad should be about a 16th inch thick, about as thick as the inkwell is deep. The dense foam sheet only worked for a couple of letter strikes, and the light fluffy foam, I couldn't cut thin enough.


Once I assessed and dusted off the main bits of the machine, I turned my attention to cleaning up the carriage and replacing the old worn out rubber. This was the cause of my first injury. The platen on the machine is pretty easy to remove. I took of the platen knob, then noticed that spring section applies pressure onto the platen. Relieve this pressure and the platen lifts right out. The design lead me to believe that the platen can be removed from the machine simply by pulling out on the knob itself...indeed, that's the way it goes.


Getting the rubber off was a nasty nightmare. The glue holding it on held fast, and I had to use a hammer and a knife.

Once I had the mess all cleaned up, I layered around four layers of heat shrink tubing around the metal core. Whatever ambient gasses left inside from its overnight soak in mineral spirits (to help loosen the rubber which didn't work) kept igniting.
The feed roller is a different beast all together. I was only able to free one half of the roller by removing the pin that pivots the feed tension spring and feed rack. The other side requires the removal of the line space selector. This is attached with a very tight compression fit.


The feed roller rubber was removed and replaced with automotive hosing, 1/4 inch inner diameter, and 1/2 inch outter.
One of the more interesting features of this machine is the lack of a rotary escapement. No star wheel. Some of the German machines used a sort of compression type escapement system, and it is very similar on the Williams. The escapement here consists of two toothed plates, one stationary, and the front one sliding. When you trip the rocker, both toothed plates move. The carriage rack slips onto the stationary one, while the moving one springs back to the right. As the escapement is released, the carriage slips back onto the front one, and the mainspring tension pulls the carriage one space to the left.

Adjusting the trip distance is a simple matter of twiddling with the square bolt in the front center of the machine. I do want to note that the mainspring on this machine is very small, and as a result, a little on the weak side. So if the escapement doesn't want to trip, but does with more pressure, than you need to lighten up the spring on the mobile plate. This spring has a super light temper, so you can gently bend it. Later versions of the escapement had a slightly better and more stable mobile plate.

This spring goes from the mobile plate to the
rocker arm.

This spring, as well as the plate, is better positioned.
The U spring escapement of the 2, also seen in the
transition period between the 1 and 2.


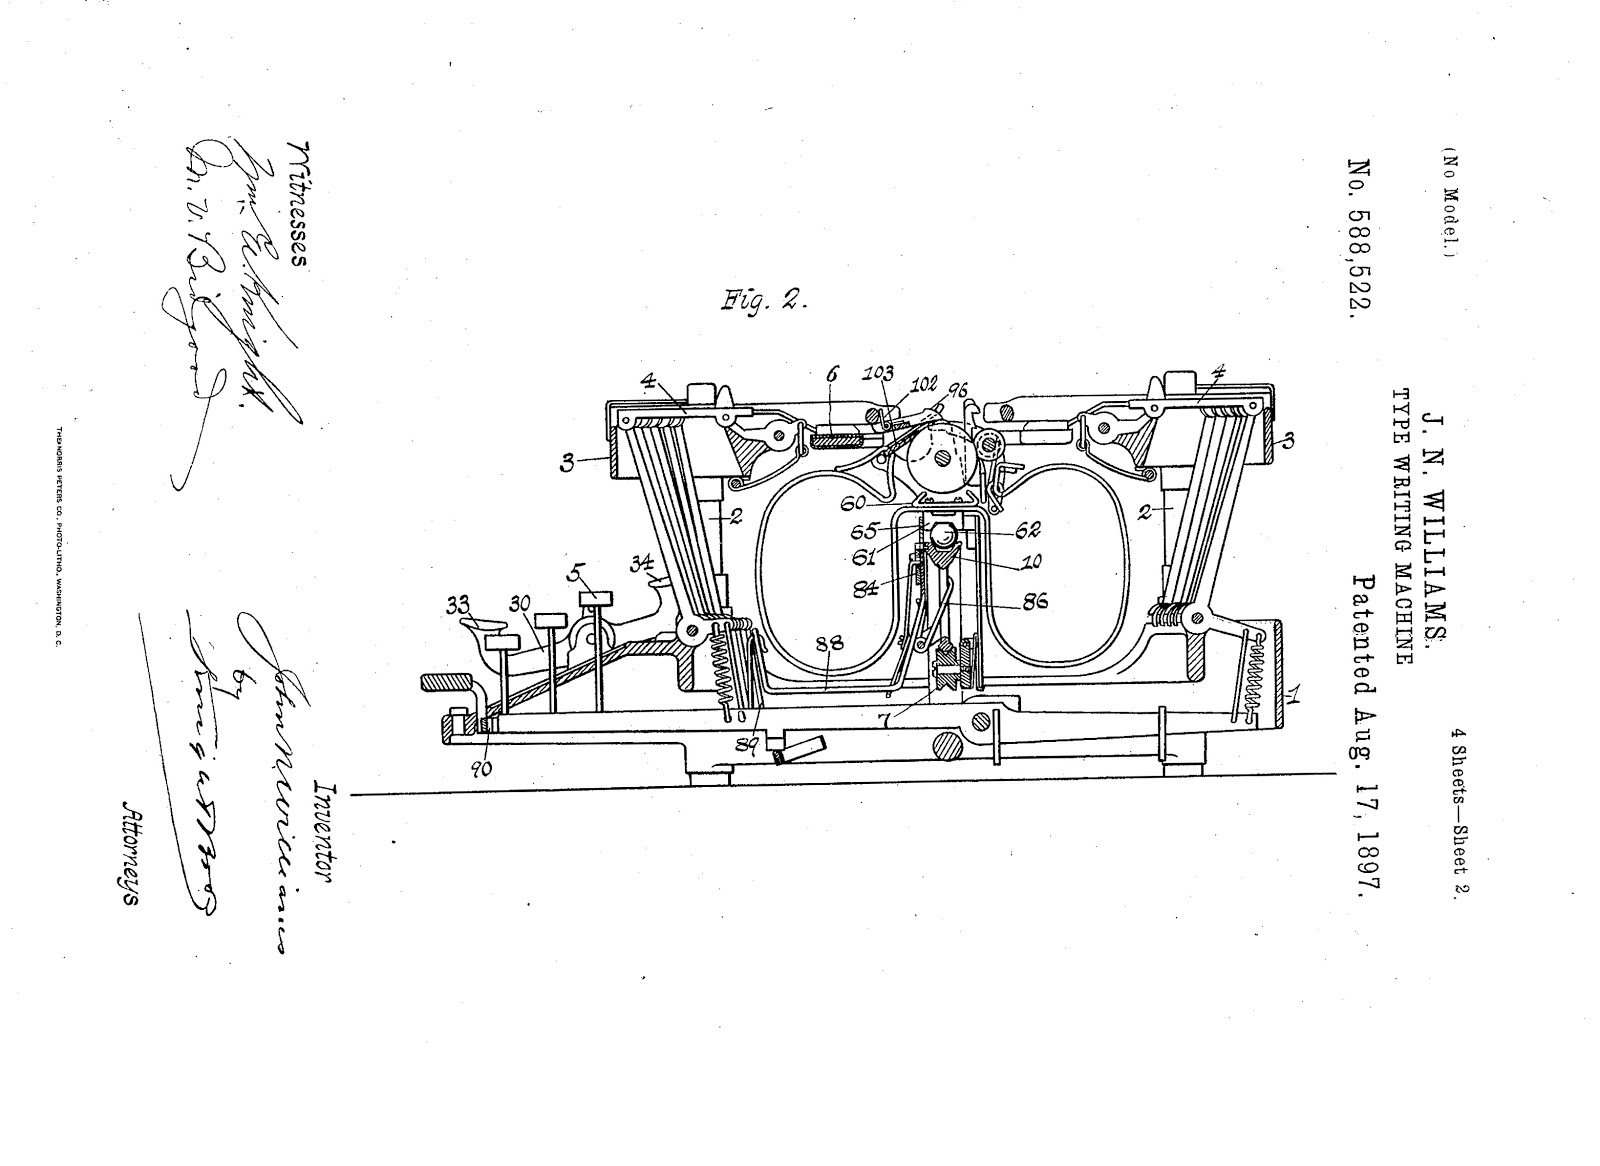
The shift on this machine is very interesting. The entire carriage is mounted on a vertical wall that holds the bell, escapement, and main spring. This wall is pivoted twice. The bottom is attached to a rotating rod, while the top is attacked to the carriage. When you hit shift or figure, you are moving the horizontal bar just behind it either forwards or backwards. This action pushes the entire wall forward or back without pitching it: it stays vertical. My machine had an issue with the springs, the main one on the rocker is broken, but it still functions. The second spring coiled around the locking also wasn't doing anything. This should rotate with the rocker to prevent either one from locking unless you want it to.


There are no alignment adjustments on this thing. The machine was marketed as having permanent perfect alignment, so if your machine is off (as mine was) you are missing the permanent alignment wheel. This tiny little wheel fits into the horizontal traveling rod, speared on the end of the screw that the locking leaver pivots on. Place the wheel, and spear it with the screw before tightening it all down.

Since I had a broken spring preventing the lock from allowing the shift and figures to move freely, I decided to fashion a thin rubber washer. This was just thick enough to give the lock leaver friction to stay in place, yet also little enough to let me move it into locking position easily.

On a larger scale, I took some rubber hosing and super glue to fashion the grip on the platen knob.
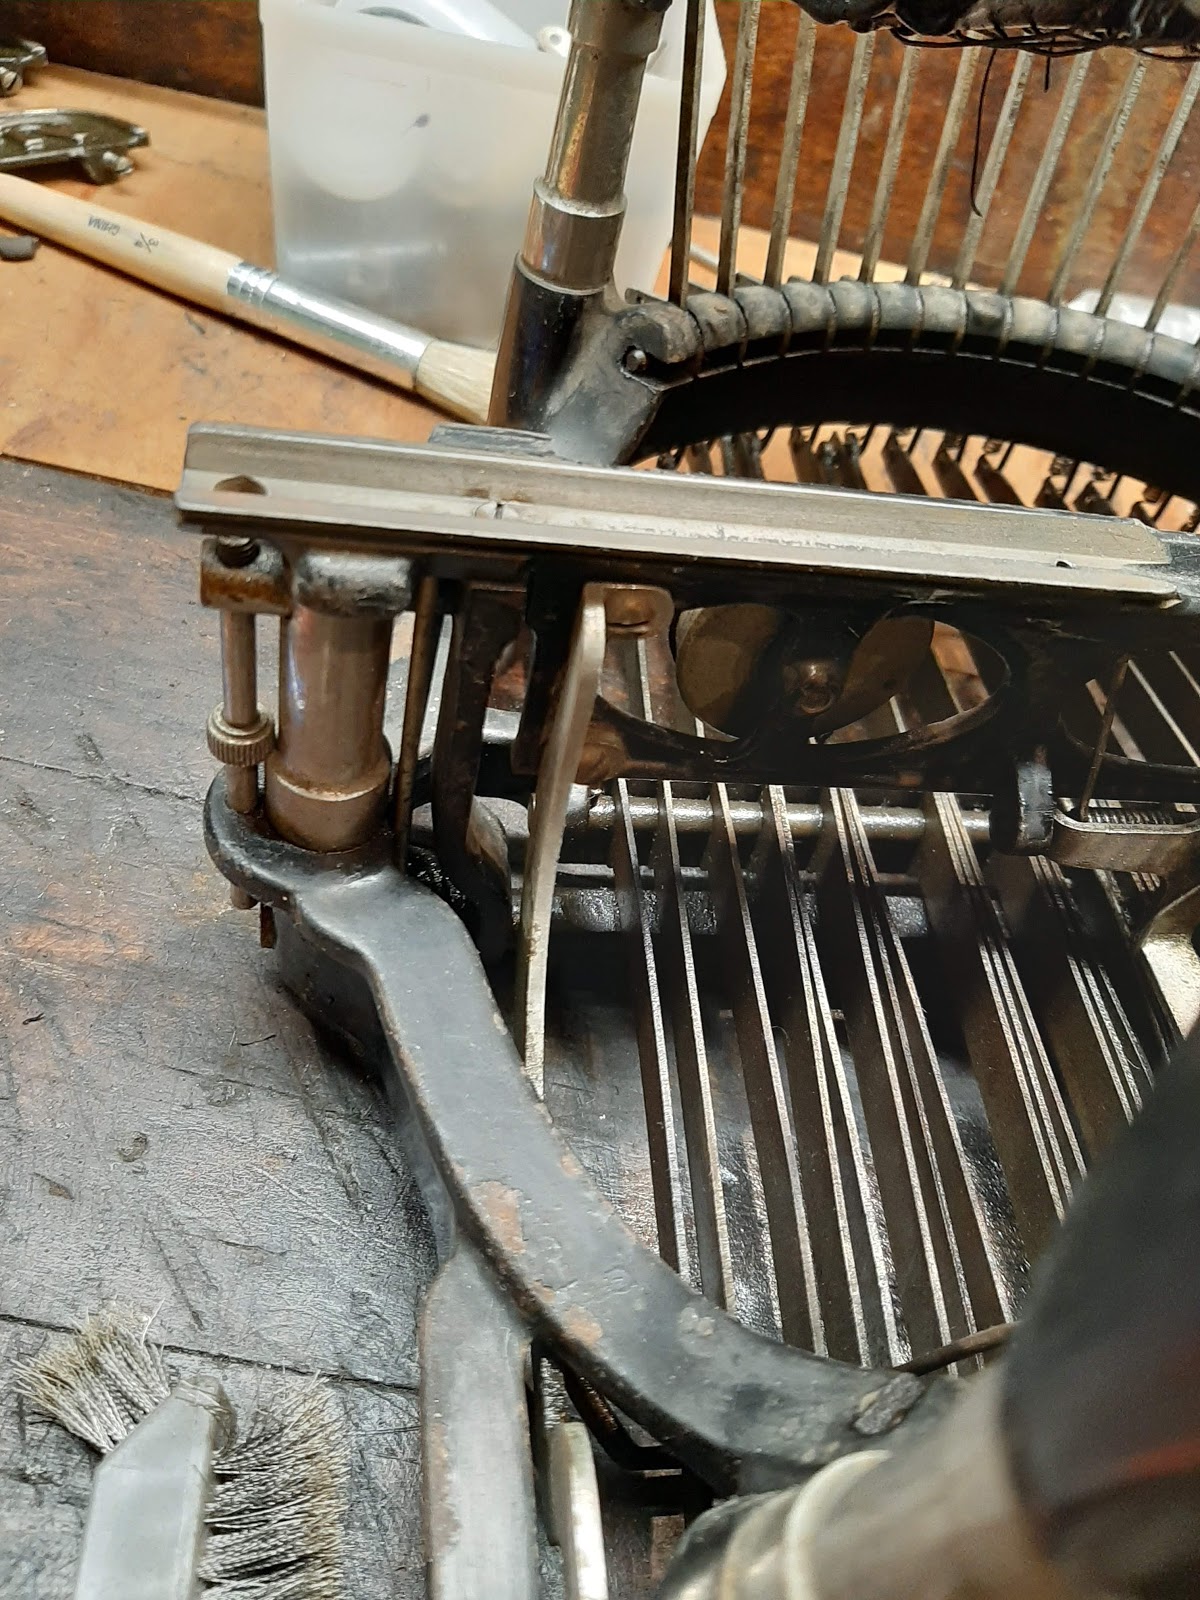
Putting the carriage back on isn't too bad. The it was clear to me that the ball bearings needed a spreader to hold them apart. Similar to most old standard machines that didn't use a toothed ring. There needed to be a bearing holder to prevent them from slipping out of place. My machine didn't come with one, nor did I know what it looked like. Martin Howard confirmed my suspicions, but didn't have a photo of his. He said he recalled it being about four inches long. My measurements told me 6. So I fabricated one, and fiddled and fiddled, and then realized one major thing. In the video from David, the side of the machine falls into frame and the camera is focused on the bearing. Take a look at the top of this article, I posted a screenshot. It appears there is nothing around that bearing. Instead the pressure of the carriage holds with enough force that the bearings don't wander. When the carriage is at one extreme end, and at the carriage stop, One bearing goes under each edge, right at the edge. They pretty much stay in place after that, and a long screw driver to push it back is all that would be needed should they decide to wander. With the carriage all the way over to the right, typing on the left side of the page, the ball bearing can be seen just under the left top rail. Same goes for the other side.

For transportation, the second variation of the model one and subsequent models had dual carriage locks.
These were small thumb screws one either side of the carriage that come up through the bottom rail, and screwing into the top rail. It holds the carriage very securely.


The previously mentioned left margin. Located on the back right
of the carriage wall. There is no adjustable right margin.


Even with wax, and steel wool, this is about
as shiny looking as it's going to get.

And that is how the paper feeds.

First type sample (technically 7th) , didn't even wait for the feed roller.
The ink pads need to be redone, and I'm pretty certain (still not done working)
that it's gonna be a pain installing the feed roller as the carriage is on the
machine.
If you are interested in taking off the type, note that it isnt an easy task. Each type bar pivots on two bearing rods. The upper rod is held in place with two screws on either side. The lower and larger bearing rod is held in place with three wedge pins that must be tapped out from the bottom.

Shown here is the lower and upper bearing rod, along with the wedge pin and a type bar


After all that I was pretty much done. I ordered new feet from Steve Dade after sending him measurements, two stacked quarter inch sections, top 6/16ths inch diameter, and bottom 10/16ths. Steve does amazing work.


Williams offered a cleaning brush and a lifting bar
That would raise the type and allow for topside cleaning


still no feed roller here
After all that I was pretty much done. I ordered new feet from Steve Dade after sending him measurements, two stacked quarter inch sections, top 6/16ths inch diameter, and bottom 10/16ths. Steve does amazing work.

Several coats of wax later I am ready to present my best attempt at making this Williams 1 rust bucket a somewhat presentable machine. With my probably limited skills (I am sure I vastly overestimate myself), I tried getting it to print as best as possible. I find it disheartening that it doesn't print as advertised, but what was I expecting from a machine 130 years old?

So here are some photos of the final product, followed by a couple videos of the typing action. I hope you enjoyed.


 an update in 2021, got actual ink pads and cut them to size, then inked with purple stamp ink. This ink doesn't dry so quick, and it prints pretty good!
VIDEOS!
https://www.youtube.com/watch?v=4UnLt8_LWWs
https://youtu.be/StjQFjTCA-0
And here's the big video:
https://www.youtube.com/watch?v=mLmqlbHUG4k&feature=youtu.be
Sources:
"Typewriters" by Peter Weil et all.
http://www.willdavis.org/TEGWilliams.html
https://www.antikeychop.com/williams-typewriters
https://connecticutmills.org/find/details/williams-typewriter-co
https://typewriterdatabase.com/williams.5.typewriter-serial-number-database

Before and After
Guess which is which.
So here are some photos of the final product, followed by a couple videos of the typing action. I hope you enjoyed.

My digital version of the side shot. One of the best
angles of this unique machine, the first being top down.


Check out that new feed roller ;)


The negatives from the Hasselblad

The negative contact sheet


Here: Fellow Collector Jack Armstrong urges me to create a meme on the Williams.


It was freaking difficult.

Having trouble getting a decent type sample.
The slugs are actually biting into the gel ink pad
and taking chunks of it with....jeez. Any inking ideas?

See, It's just fine, just can't get "just fine" all on one card.
Printing with felt pads and coffee filters:
https://www.youtube.com/watch?v=4UnLt8_LWWs
https://youtu.be/StjQFjTCA-0
And here's the big video:
https://www.youtube.com/watch?v=mLmqlbHUG4k&feature=youtu.be
Sources:
"Typewriters" by Peter Weil et all.
http://www.willdavis.org/TEGWilliams.html
https://www.antikeychop.com/williams-typewriters
https://connecticutmills.org/find/details/williams-typewriter-co
https://typewriterdatabase.com/williams.5.typewriter-serial-number-database


Absolutely fantastic restoration job. Thank you for sharing your Williams journey with us, and all that went with it. You've certainly increased my interest in owning one by a considerable margin. Looking forward to seeing what you reel in next!
ReplyDeleteI am very glad you liked it! I do hope you find one, they pop up from time to time. I'm hoping to get my hands on a number 3.
DeleteOkie doke, I think today I'll add this article as a reference to TWDB and update a few details on the Williams page. I've forwarded your receipt on to Tyler, who approximated the current age list a bit ago, and I'll poke him again to see if he's figured out how it changes his assumptions given how it fits in with the data points he'd collected. Might be a bit, as I know he's got a lot of irons in the fire.. (:
ReplyDeleteI am very gracious! Thank you!
DeleteThank you for sharing your restoration story, I recently acquire a No 6 and is in the process of restoring it to working condition and your article help.
ReplyDelete