1906-8 Hammond 12
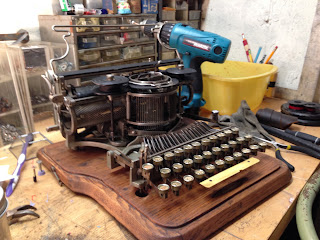
The Hammond 12 was debuted in 1904 at the Louisiana Purchase Exposition. James Hammond's machines had been considered technological marvels a few years back, beating out other prominent manufacturers such as Remington. The introduction of the number 12 only served to propel Hammond's reputation as a mechanical genius further and further. The number 12 on it's own was an updated version of the number 2. It came with both an ideal and a universal keyboard, the one I have here being universal. The two major things that this machine improved from the number 2 was the introduction of a ribbon vibrator (which kinda works) to increase type visibility, and the addition of a two color lock. This two color lock allowed the user, for the first time on a Hammond typewriter, to type with a bichrome ribbon. Hammond called this little leaver, the "Polychrome Ribbon Attachment." Early number 12's came with four rubber type heads on the hammer, but the machine I have above seems to have steel heads, yet the serial number dates it to 1907 or before. In addition to the features of the machine, the celluloid nameplate and spacebar were available in both tan and black, yet the plate on my machine came missing. In 1912, Hammond released a reversible version of the number 12 for typing middle eastern languages, and in 1913, released the Hammond Multiplex, which was designed to hold two type shuttles and type two typefaces/languages at once.
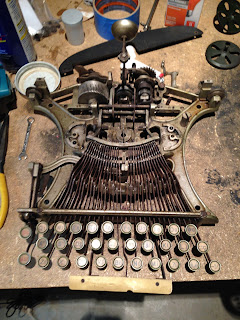
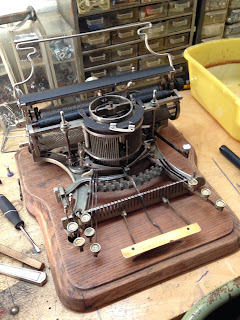
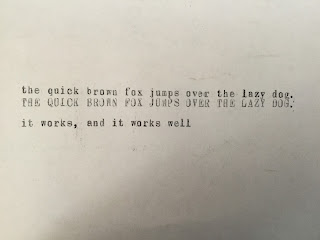
So here we have some mostly unfamiliar terms laid out here. If you notice, the Hammond is quite unlike any traditional typewriter. This is what makes it special. Instead of hitting a key to swing a type slug up to smack the ribbon and paper, the typeslugs are all arranged on a curved piece of vulcanized rubber called a type shuttle. This shuttle is mounted onto a turret, and is free to swing left and right, depending on the keys you strike. Once you hit a key, it does three things. First, it raises an Indexing pin which corresponds to the correct key on the shuttle. Then it raises the lifter arms, one for each side of the keyboard, and swings the shuttle arm. The rear tail of the shuttle arm smacks the index pin and stops, while the final bit of keytravel trips the escapement, and sends a rear mounted hammer to smack the back of the page into the type. It';s a complicated machine, but when it works, it works well.
Another important thing to note about Hammond typewriters, is the lack of a platen. Instead, the machine uses two pressure rollers to control the horizontal line spacing, and the hammer strikes the rear side of an Impression Strip. This essential piece of rubber stretches the entire length of the carriage, and provides cushioning for the type to give an even letter impression. When typing without one, one can risk cracking or damaging the shuttle.
While the Multiplex, which I have worked on before, is designed to carry two shuttles at once, the Hammond 12 can accomplish the same thing as well. When you lift and rotate the turret, you'll find an L shaped bar holding the top of it down. This bar serves two purposes. One, to index the turret on the head of the lowercase alignment screw, and another to apply downward pressure to rest the caps and figures. Did I mention this is a three bank machine?
The Hammond is an amazing machine. J.R.R. Tolkien hammered out Lord of the Rings on it, and Woodrow Wilson hammered out his speeches. Eventually Wilson's machine was gifted to Kennedy, and remains at the white house. When these machines are adjusted, they work very very well. The spring loaded hammer keeps the letters very even, regardless of how hard you hit the keys. They are light for sure, with minimal travel, though you can jam the shuttle arm if you try indexing too many pins at once! Of course, Hammond the man was much more interesting, a kind and generous man to a fault, and an incredible inventor. I would go on more about that, but I know Jonathan Posey would give a much better version of the tale, which you can listen to on the Austin Typewriter Podcast. Check out Episode 17 for more!
Without further ado, I'll tell you how I acquired a rusted hunk of metal and turned it into a well working 113 year old typewriter.
CHAPTER ONE: AN AFTERNOON ON EBAY
Kidding, I'm not going to be doing that. But it is true. I have been looking for a Hammond for a very long time. When I first started collecting, I never wanted a load of typebar machines. I wanted the ones like the Blicks, or Chicago's, or the upstrokes and index machines. Most of all, I wanted a Williams. But those were expensive. When I finally found a Hammond for 280 a couple weeks ago, I decided I was going to try and go for it. I offered the seller 175$ and to my complete surprise he agreed! The machine itself arrived poorly packaged, rusted beyond belief, and in completely non-working condition. It was missing both the nameplate, and the backspace key.
It wasn't too hard for me to take care of those two, and for the most part, the machine was intact. It had a Hispanic type shuttle and key legend, which was alright, and both original Bakelite Spools. The left one was branded Hammond Typewriter, while the Right one stated Hammond Scribemachine. I thought it was odd, until Jon called me an idiot and told me that ScribeMachine was Typewriter in German. Okay, fine. In addition to the rust, the paint finishes were badly damaged, and so were the rollers. At the time of this article, I still haven't redone the front roller, and the rear is going to remain as is because I don't feel like taking apart the entire carriage.
My custom backspacer. Used a 40's QDL key
I removed all the removable portions of the machine, and took it off the base. I cleaned the spools, fixed the split in the wood, and began to take the machine apart. Hammonds come apart pretty easy, the keys can all be removed once the bar across the top is off, the cage can be removed after taking off the ribbon transport system and two base screws, and the carriage comes off easy too. The carriage is held on with two clips on the rear corners of the frame, one middle roller under the hammer, and a front roller assembly in the turret. Make sure the front one comes off first.
Once I had these all off, I took the painted parts and sanded them. They each got a good coat of matte black and were left to dry, while I cleaned the cast iron frame. The escapement got left alone, didn't need to be taken apart, just cleaned up. This machine does not have a drawband, instead the mainspring drum is toothed, and the carriage rack connects directly. Drawbands were later added onto these machines with the introduction of the multiplex.
Once the frame was clean, and the wood base was clean, I set both aside and began to work on the carriage. The front pressure roller can be removed with the screw and bracket on the left. From there, everything was hand cleaned, polished as best I could, and put back together. The rust had removed a lot of the plating, but I got it looking decently nice. As long as you haven't undone the carriage return arm (which has a tiny hairspring coiled inside) putting it back together is an intuitive breeze. The only thing to watch out for is the bell arm, which fits between the top carriage rod and the cover plate. The bell arm must be free to swing up, and stick straight out in resting position. When the hammer strikes forward, the bell will strike the arm, and the arm will swing out of the way to let the machine continue to type. There are no margins.
The cage was cleaned much the same way. I used cleaning solvents and brushes, as well as a rotary brush on my drill. Be very careful with the return springs on the index pins.
Mainspring grooves for carriage.
Couldn't repaint turret cover. Too rusted up.
Then it was time to put it all back together. The carriage went on first, the mainspring was wound, and adjusted so it was tight enough to pull the carriage and reset the hammer. There are two adjustment points for the escapement, and now is a good time to mention them.
First, notice the far left pawl on the star wheel. That spring shouldn't be there. It is counter-weighted and doesn't need spring tension. Second, the red screw adjusts trip travel. Make sure it isn't too tight or it will also prevent the shuttle arm from indexing properly. The blue screw is hammer tension. It controls how hard it hits the page. If it is too tight, it will be difficult to reset under mainspring pressure.
original aluminum clips
soldered copper
Once the Machine was complete and the keys were installed, I set about creating a glass nameplate. I want to etch it in the future, but as of now I think it's alright. Once I cut the glass, I ground, foiled, and soldered the edges. Originally as you can see, I had two aluminum clips to hold it, but these didn't work. I opted to use copper clips soldered directly to the glass. These then screwed down over the keyboard.
After that, I wound on a new ribbon (hammonds, like Olivers, take 7/16ths but half inch works too). The Hammond spins both ribbon posts in opposite directions, and it's the user's responsibility to tighten down the thumbscrew to control which spool is the driving spool. Tightening it expands the collett inside and holds the spool to the post, while the other one is left lose and free to spin. Then I set about setting the type. The hammer is going to strike the shuttle, and to make sure it only hits one letter at a time, a shuttle guard is stretched across the back of the ribbon, with a cutout the size of a single letter. This guard must be centered so the hammer type head fits through without hitting any of the edges. Once that is set, I undid the locknut on the turret. This long tall screw holds the turret at the proper height for lowercase letters. It must be high enough to let the mechanics pass freely underneath, but low enough so the tops of the letters can be printed. After that, the screws under the caps and figure keys can be adjusted to control the caps and figs relative to the lowercase. In this machine, I had to take a blowtorch to heat and bend the figure bar, because it bottomed out before I could get the figures in line.
Getting the type aligned and printing smoothly is the hardest thing to do on this machine. A lot of it is escapement adjustments. You want to make sure the Hammer strikes AFTER the key is indexed, or you'll get smudges and smears. Yes, an Impression strip helps. Get one for $15 of of ebay like everyone else does.
I hope I kept things brief and informative, I still need to redo the front roller, but as of now with all my adjustments made for the most part, I am quite pleased with the results.
It prints even, straight (need to fix caps again) and legible. That's all I ask for. Loading paper can be done many ways. Some release rollers and roll the page up, inserting it from the side, and others just roll it in straight down from the top. The fancy curved bar is essentially your bail. It holds the top of the page back.
The Hammond is a brilliant machine, and they only got better as time went on. It remained perhaps the only alternative mechanism to survive the early 1920s, and make its way into homes and offices for decades to come. After the death of James Hammond, it was sold off and re-branded the Varityper.
EDIT: got it working flawlessly with a new feed roller from a parts machine, as well as two mint spools.
YOUTUBE KEEPS WRECKING MY VIDEO QUALITY!!!!


nice and great restoration work.
ReplyDeleteSo happy I found this post. A very generous person gifted me a Hammond 2. I am completely unfamiliar with Hammonds, but your post is full of great information and will help me a lot.
ReplyDeleteHi Lucas, I still can't work exactly where the type/letters are and how they strike the paper. Are you please able to expand?
ReplyDeleteJust a few inaccuracies. Reversibles came out in 1913 with the Multiplex, not the 12 model.
ReplyDelete